Just in time for a mini heatwave to hit the UK (!!) my first piece of summer sewing, a new top, is done. (And I'm wearing it today and it is perfect for our suddenly-summer weather :D).
I've been wanting to try sewing with double gauze for a really long time, ever since I ran across Nani Iro double gauze prints back when I first started sewing and read about how amazing this fabric is to wear. I've still never bought any Nani Iro because my credit card screams and cringes away from me at the mere thought. However, back in February I ran across some (marginally) more affordable double gauze and splurged on it (and it WAS a splurge: £9/m and it's only 110cm wide! D:). The colourway I picked is a faded dark blue with white polka dots on one side and white with blue polka dots on the other.
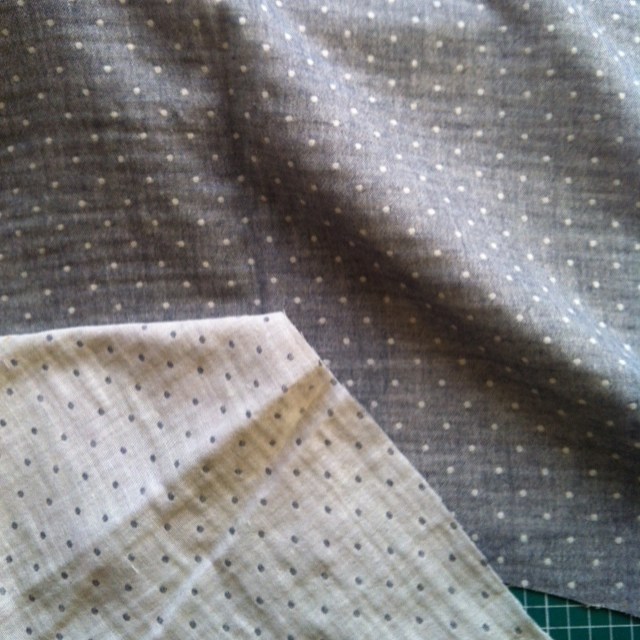 |
| The two sides of the fabric |
When you read about sewing with double gauze, all the pattern advice seemed to be not to make anything that needed enormous precision as the fabric distorts easily when you sew. This was uppermost in my mind when I was looking for a pattern. My other criterion was that I wanted to make something that would take some advantage of the fabric having two usable sides, but I didn't particularly want to colour block.
I spotted this simple top in Burda 03-2016 right about the same time I bought the fabric, and the dipping rear hem seemed like a perfect use of a two sided fabric. All I had to do was wait a couple of months for my summer sewing season to roll around. You'll notice
I declared it was summer sewing season on like, 1 May, and I finished this top on the 4th, so, you know, not that I was at all impatient to make it or anything! :D
 |
| Burda 03-2016-104: images from Burdastyle |
The pattern itself, Burda 03-2016-104 (which has various variations -- #103-107 are all different top and dress options on the same theme) is really simple -- it's just a darted woven tee with a split at the neckline and three quarter sleeves, and a big inverted pleat in the back.
 |
| Burda 03-2016-104 in polka dot double gauze front view |
I made a straight 44, as is my wont at the moment with Burda patterns, with my usual minor fit alterations (square shoulder adjustment, lowered the bust point) and a pretty substantial length alteration. I am not at all into crop tops as a look for me personally so I added 6cm to the length at the waistline. I also cut a 3cm hem allowance as instructed by Burda, but when it came to it I really loved the length before I finished the hem and didn't want to lose 3cm, plus turning up a 3cm hem on such a curvy hemline: ugh! I ended up just overlocking the edge and turned up the width of the overlocking, about 8mm. Overall, therefore, I added just over 8cm to the length.
 |
| Burda 03-2016-104 in polka dot double gauze - side view -- you an actually see the hi-lo hem in this shot! |
As far as construction goes, Burda rate this as a one and a half dot pattern for difficulty, and it is in fact exactly as straightforward to make as this suggests. My main difficulty was the bias binding/facing around the neckline. It took me a little while to visualize how the finished neckline was going to go together at all, though once I worked it out I couldn't understand why I'd been confused. I always find that if you can work out what it is Burda want you to do, the finish is usually lovely. It's just that it sometimes takes me longer than it should to figure it out in the first place!
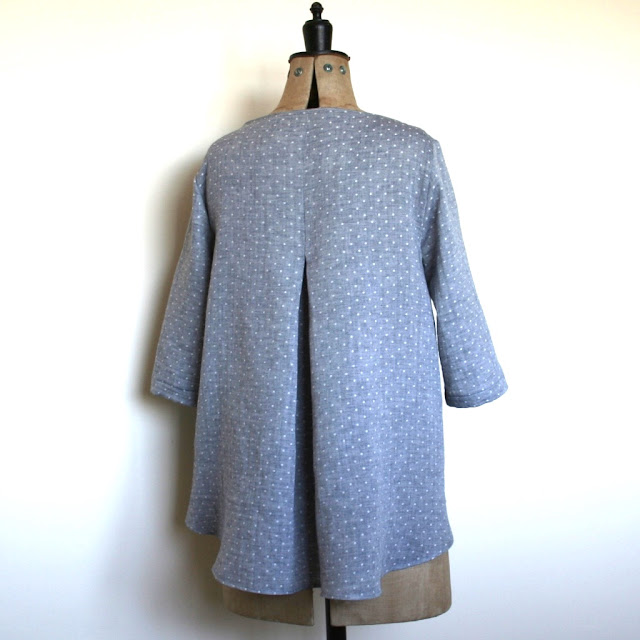 |
| Burda 03-2016-104 in polka dot double gauze -- rear view -- that inverted pleat is ENORMOUS |
However, although in theory once I worked out what I was meant to do the neckline made perfect sense, in practice it was still a bit tricky. Although the double gauze fabric is very light it soon stacks up in bulk. In places, like the back neck, where I had layers of fabric for the inverted pleat, the amount of fabric to go under the neckline binding was quite substantial and took some effort to enclose neatly.
 |
| Burda 03-2016-104 in polka dot double gauze -- inside out view -- this is how the neckline looks internally when finished, which I think is really neat. Also I did ALL of the french seaming including the armholes for a change. |
For my own construction choices, I basically French seamed the crap out of this shirt. I do tend to French seam or flat fell almost all my woven tops at this point, especially when the fabric is shreddy (this double gauze shed threads like mad) but I've not done too many proper French seams on armholes. In fact, I think I've only done it once before -- normally even if I flat fell/French seam everywhere else I just overlock the armhole. This is because when I first started making woven tops about 18 months ago, I had such problems setting in sleeves that I always dreaded that part of construction. There was no way I was going to seam them twice! More recently though I've had such a run of good experiences setting sleeves in that I have more or less lost my fear of it altogether. I decided this time to have another stab at French seaming the armhole on this top... and it came out perfectly! I'll probably do it more often now.
 |
| As modelled by me. Sorry if I look a bit crumpled, by the time I took these I'd already gone out to do my grocery shopping and come back again. It is a LITTLE wide at the neck, as you can see from the fact that the straps of my white tank top beneath just show. |
The big question is, did the double gauze live up to my expectations? Overall, yes! It's lovely to sew once you get used to the way it's both bulkier and more fragile than regular cotton lawn or poplin, and I love the way it feels to wear. One thing I am a bit surprised by is how much body the fabric has -- I sort of thought it might be a bit drapier because the fabric is so soft, but it stands away from your body more like the way a crisper fabric might. I definitely agree with the advice I read about avoiding construction that requires tremendous precision. The fabric isn't shifty like
last week's navy viscose -- in fact it was lovely to cut out -- but if you're off the straight grain at all it stretches like c-r-a-z-y. The bias binding for the neckline was probably the stretchiest bias binding I've ever made. For me personally, at my level of sewing expertise (lol, 'expertise'), I'd hate to try to sew e.g. shirt pocket corners or something where I would want perfect angles because I think it would get very ugly, very fast.
In conclusion: I'm basically in love with this top and the fabric. I had been planning to buy some white linen for another top to sew later this summer, but I've managed to squeeze another 2m piece of double gauze in plain white out of my budget instead, so look out for that some time in the next few weeks. :D
Up next: I have a whole slew of little easy things up next in my queue -- all of them are not-very-interesting-but-wholly-necessary summer wardrobe needs and I want to just plough through them so that I have everything on hand.


This is really gorgeous. I've seen a lot of that inverted pleat on the back look, in street fashion. I really like it. It looks to have great proportion.. plus that fabric, swoon!
ReplyDeleteThank you!
DeleteI am so in love with this fabric. I've been wearing this top today and just, I LOVE double gauze. It's my new most favourite thing ever :D
I love this top--it looks great on you. I've bookmarked the pattern because I think I might need to give it a go this summer. I haven't french seamed sleeves or used double gauze before, but I've been curious about both. I'm going to have to try both out now!
ReplyDeleteThanks! Look forward to seeing your version if you decide to go ahead with it! :D
DeleteThanks for this post. I am also a 44 with square shoulders and your gorgeous version has convinced me to go ahead and make this pattern.
ReplyDelete