My overall goal for 2018, you might recall, is to use my stash to make the things I've been imagining owning for a while now. My very first finished item for 2018 exactly fits this criteria: it's a coat for which I bought the fabric and lining way back in 2012 (long before I had any of the sewing skills necessary to, you know, make a coat!). I've really needed a navy coat for a few years now, so this was also a BIG wardrobe goal.
In all the time I had "make a coat with these fabrics" on my To Do list,
I never had a particular pattern in mind, although I did have an idea of the
overall style of coat I wanted. I already own a (RTW) winter coat that
is a princess seamed fit and flare type of thing, knee-length, with full
skirt. That shape is probably my favourite sort of coat overall -- in
part because it really suits my figure but mainly, if I'm honest,
because I like the way that style flares and moves when I walk. However,
as much as I enjoy swooping about with excessive drama, it has a fairly
formal and fitted look, and it's hard to wear over bulky layers. My mental image of the coat I wanted to make
was therefore something less fitted and straighter, and overall more
casual. I wanted something single breasted, with an open neckline
(rather than something that buttoned up to the neck).
 |
| Burda 11-2015-116 Coat (images from Burda.ru) |
My major constraint was my 3m of cotton moleskin fabric, which, if you're not familiar with the fabric, is a densely woven napped fabric. Three metres sounds like a lot but it's really only just enough for a knee length coat. I eventually hit upon this pattern from the November 2015 issue of Burda, which is actually a Tall pattern. I haven't seen any English language reviews of it, but as always there are at least a dozen reviews on Burda Russia, and I thought it looked quite nice on a variety of body types. This pattern does have bust shaping -- you just can't tell because the darts are from the neckline and are completely hidden by the collar. My biggest concerns about the pattern were the dropped shoulders (which is not a style I necessarily love on my square-shouldered body shape) and the giant lapels/collar.
I made a (hideous) muslin right at the end of December. I started with a size 88 (a Tall 44), and made fit adjustments I based on my experience
making my blue wool jacket: I did a rounded back adjustment, raised the armhole and narrowed the shoulder (even though this is a dropped shoulder style).
 |
| Hideous muslin of Burda 11-2015-116 |
I actually really liked how it looked, even the giant lapels, except I had major shoulder issues. My shoulders are very square, and as a result the shoulder line just looked really odd on me. Normally, so far, I've found that any pattern that calls for shoulder pads can be "altered" to fit me simply by missing out the shoulder pads. On this pattern though, it still looked wrong even without the shoulder pads. I messed about with the shoulders of this muslin for a while, but in the end what seemed to produce the nicest overall outcome was to do a small-ish square shoulder adjustment on top of leaving off the shoulder pad. That smoothed out the line between my shoulder point and the seam of the dropped shoulder on the coat.
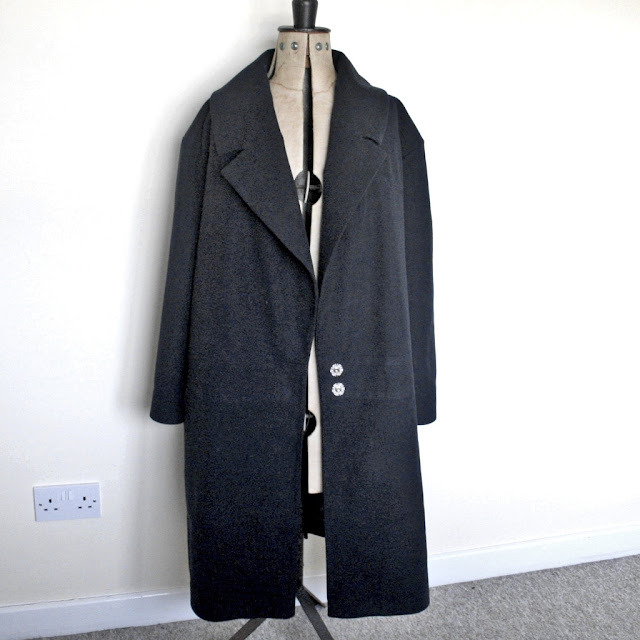 |
| My finished coat is navy, which means any and all details are invisible, even massively over-exposed. |
Once I had the shoulders figured out, I decided to plunge into the project and I cut it out early in January. As it happens I ended up having to take about ten days off from sewing it up because I had a whole bunch of other things come up that I had to deal with. I just couldn't find the time or enthusiasm to get into my sewing room, not least because I had had to stop just before my least favourite of all sewing activities -- applying interfacing. Yes, even with my new Singer press, I still dislike interfacing. (My press worked brilliantly though, I love it and am 100% glad I bought it!)
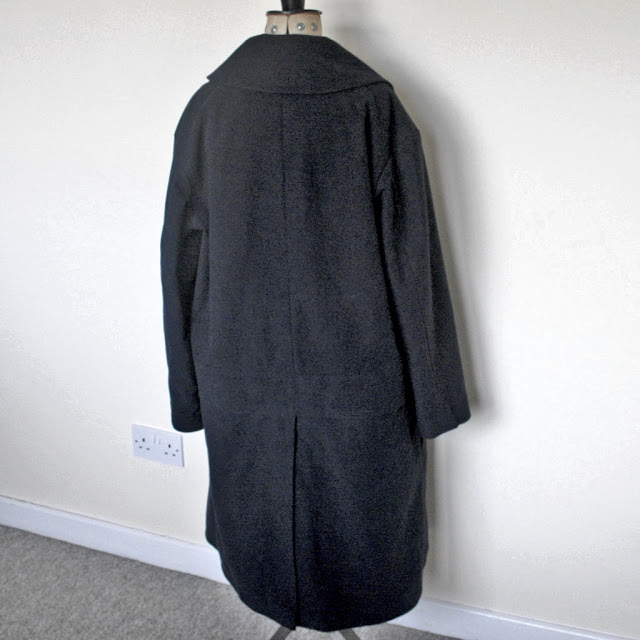 |
| Rear view. There is a vent right from below the horizontal band to the hem, which caused no end of problems in the lining phase! |
The actual sewing was pretty easy. The pattern is the "Sewing Course" pattern in this issue of the magazine, so it has pretty detailed instructions compared to most Burda patterns. I made no design changes at all, and didn't even really deviate from the instructions except that I chose to bag the lining rather than do Burda's preferred hand-sewing method.
 |
| Lining side out |
My lining fabric is a flannel-backed poly satin in teal with purple paisley, which sounds vile but goes with the plain navy quite well, I think. The flannel backing is quite lightweight, but I thought it would add some extra warmth to this coat. I have to admit, it only occurred to me AFTER I cut out the entire lining that, oh hey, it has a pattern, maybe I should have tried to do some matching! So, my paisleys definitely do not line up neatly at all. Oops. I mean, I don't really care, because who is going to see it, but it would have looked nicer if had done at least a LITTLE pattern matching. In fact, if I had thought about it, I would have joined up all the front pieces and cut a single piece instead of replicating the bodice/waistband/skirt pieces. There's no real need to piece the lining front like that. (The back, yes, because of the way the vent was constructed.)
 |
| My first notched collar (and these are the actual real colours of my coat) |
The hardest parts of the sewing were the notched collar, which I had never done before, and attaching the lining at the back to the vent, which I screwed up twice and had to rip and re-sew. The notched collar turned out OK, if not perfectly -- I felt like the outcome was pretty good for a first try at this style.
Other nit-pickery: this is a type of cloth that responds really badly to being pressed with seam allowances underneath. (I know there's a word for when you get the ghostly images of your seam allowances through the fabric, but it escapes me.) There are a few places on my coat where I struggled to get the right balance between actually pressing my seams out and not getting that visible mark. I don't think it looks terrible, and it's definitely in the 'you can't tell from 1m away' category of problem, but eh, I still wish it hadn't turned out that way.
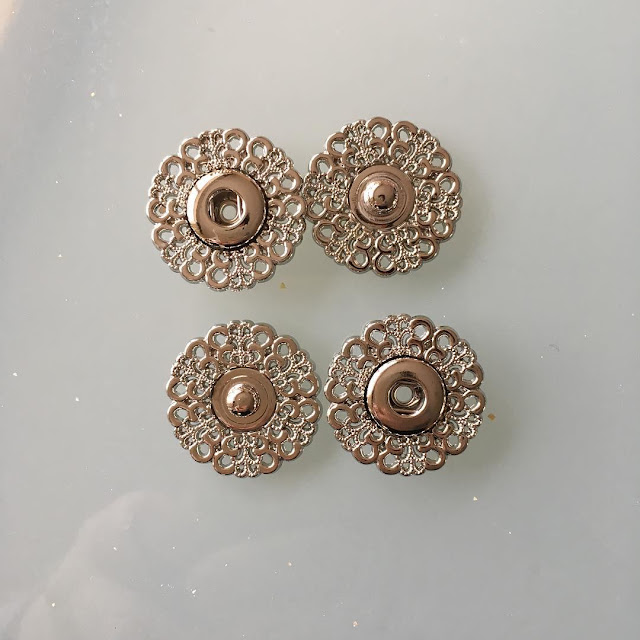 |
| Very fancy snap fasteners -- could NOT get a decent shot of them in situ, so here they are before attachment |
The coat fastens with snap fasteners rather than buttons. Since I know I am probably going to wear this coat open/undone a lot of the time, I decided to get these fancy snap fasteners. They were from a vendor on eBay in China. It took a few weeks for them to arrive, but it was worth it for how gorgeous they are. I got a pack of 6 for, I think, £6 including postage -- not cheap, as these things go, but they are significantly prettier than the standard snap fastener and definitely a good addition to my coat!
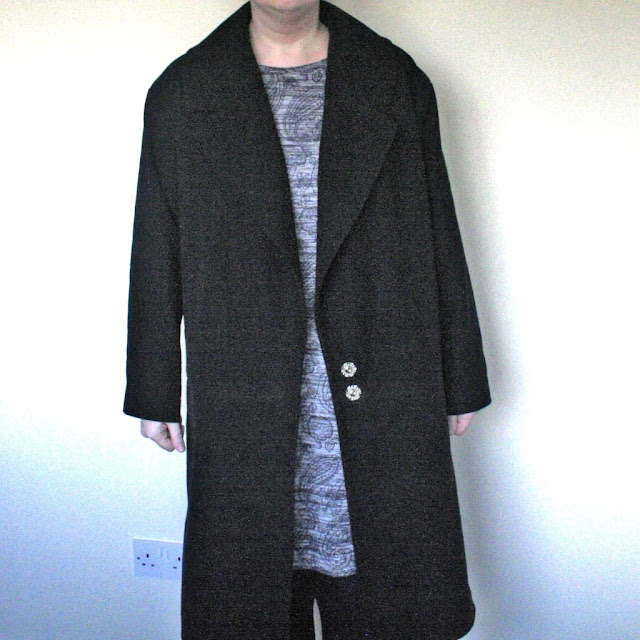 |
| A very inferior photo on me, sorry for the quality |
As far as the fit of the finished coat is concerned, I like it a LOT. I think the shoulder line looks fine, and I really like massive collar. The one fit problem I didn't anticipate is just how LOW those pockets are. Although this is a Tall pattern (and I am officially 3cm too short for Tall) I am not sure how I could have altered the length. If I had taken any length out of the bodice or waist band, it would have raised the back vent to a very strange level on my body. It's not really a problem, but it's definitely a pocket you reach into rather than stuff your hands in comfortably.
Overall, I am really pleased with my coat, and it is definitely a good feeling to get such a long-anticipated project done so early in the year and in good time to get some wear out of in the dregs of winter.
Next up, though, something much less practical for my January Magazine Challenge item!


How warm is your coat now that it's constructed?
ReplyDeleteHard to say as I only finished it last night and haven't left the house today! However, on the warmth side, I used a fairly weighty fabric and flannel-backed lining, so there's some bulk to the fabric that should keep me warm. On the other hand, that collar/neckline is really quite deep, even when the coat is done up, and I definitely think I'll need to "fill the gap" so to speak, by wearing a scarf. However, it really doesn't get all that cold where I live (a very cold day is around 0C to 5C) so extreme warmth wasn't a huge priority for me.
DeleteThanks! I'm in Dublin so the weather isn't a lot different to where you are. I have a moleskin fabric, and while it is quite dense, it isn't very heavy (I think). More of a heavy trouser weight or a light jacket weight IYKWIM. I wasn't thinking of a jacket/coat with it, but you've made me think :).
ReplyDeleteYou might be surprised by how heavy the moleskin feels once you've interfaced it! My piece wasn't the heaviest weight moleskin I've ever felt, but when you're wearing 3m of it, plus interfacing, plus lining... Another option could be to buy (or make, if you're feeling energetic) a quilted lining fabric to bulk it out?
DeleteWell... For reference, I think you do about twice the sewing I do? I like the planning though, and I love the look of the coat on you!
DeleteThanks! I hope your coat (or whatever else you make with your moleskin) works out well :D
DeleteWhat a gorgeous coat! And congratulations on using something you already own to make something you've long wanted. That's very satisfying indeed!
ReplyDeleteThank you! :D I am very pleased to be able to tick that task off as DONE. :D
Delete