Thursday 31 January 2013

Plans for February and another quick bag

Planning a month ahead really worked for me in January, even if I didn't really get every To Do item done, or it didn't turn out quite how I expected. I dealt with my red top (although mainly by deciding it was a wadder, alas), I tried out knitting with great results, I added a couple of bags to inventory (see below for the second one I finished this month) and best of all, managed to get my bag done for the PR contest that finishes mid-February.

February is going to be a really tough month work-wise so I am going to keep my goals as relaxing and simple as possible.

1. Bags. I only got 2 bags made for my shop in January so I'm a bit short in a couple of categories. I still need to make 2 clutches and 2 small bags, and then also keep my stock up to date if I make any sales.

2. Knitting. Really, my only knitting aim is to get another project cast on. I'm really torn about what to make, so really most of the effort in February is going to be finding a project, maybe buying wool and casting on. I have (fatally) discovered that the Village at the End of the Universe where I live, which has basically no amenities or places to shop DOES have a tiny yarn shop, so I think some of my craft budget will go into their cash register this month.

3.  Clothes. I want to get one top made from my list of possible TNT knit top patterns. I'd also like to spend a couple of hours on my woven bodice sloper.


Finally, just under the wire for January, I did finish another bag for my shop last night. It's another Daphne tote, a pattern I love to pieces. They always sell really well also, rarely hanging about in inventory for more than a couple of weeks. I think people like how simple they are. The factory shop near where I live is a godsend for this sort of thing because I can pick up beautiful designer home dec fabrics as small remnants perfect for this sort of bag. This one is a Lee Joffa fabric called Hollyhock and I think it makes a gorgeous spring bag.


Tuesday 29 January 2013

The TNT Master Plan #1: Cake, frosting and The Master Plan

I've spent ages in the last couple of weeks sorting out my wardrobe, recording everything that I have in a massive spreadsheet, and then going through it all in different ways to figure out how it all fit together as a wardrobe, what I have, what I need, what I want to make, and how I want to move my garment sewing on this year. It's been a lot of navel gazing!

A part of my answer to the question of what I want to do next with my sewing has come from joining a PR Message Board sewalong called TNT Basics Sewalong. The idea of the sewalong is to figure out some good basic patterns that cover a reasonable percentage of your wardrobe, and then make sure you have tweaked them into fitting as well as possible. The idea of having well-fitting patterns that I know I like is now super appealing to me, but at the same time, I really had to think my way through it over the course of this month.

The reason for all the thought is that there's a part of me that rebels against the idea of making a wardrobe full of TNTs. I'm not a wildly novelty-seeking person, but there's a part of me that wants to imagine sewing as a non-stop hobby of trying new things and to imagine my wardrobe as a wondrous place of variety. Except, my wardrobe is REALLY NOT that and never has been, and I'm not sure I really want it to be. I want to explore style a little more, but I'm not going stop being who I am at the very heart of things. In the end, I like to be able to put on things that feel familiar and look good, even if it means there's a lot of fundamental repetition in how I dress and the novelty, such as there is, all comes from colour, fabric and a few little decorative details. All the things in high rotation in my wardrobe are very similar, often even multiples of the same item in a different colour or fabric. I wear those things rather than other things I own because they're more comfortable, more flattering, they fit better and the colours are exactly to my preference. Plus, I just LIKE them better. Moreover, I have VERY OFTEN found myself wishing I had gone back to shop X and bought another of those shirts, or that shop Y had stocked more colours that I liked of that knit top. Basically, I'm MADE for the TNT approach, is what I'm saying.

Now I've thought about it, there's a big part of me really cheering the idea that if I decided I want a new shirt in, let's say, purple, I'd just have to look for nice purple fabric (which I LIKE doing) not trail around the shops looking for the magical combination of the shirt that is the right colour, is a flattering fit, is available in my size, is within my budget, and so on (which I despise as an activity).

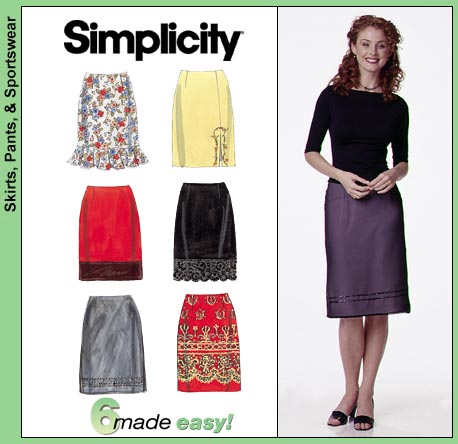
A "cake" skirt: I'd be happy with several
On the other hand, I still do like novelty, and I do want sewing to be an adventure. So I also decided there are probably categories where I don't want to spend a lot of time looking for and perfecting a TNT, like dresses, evening wear, jackets, etc, because I would prefer more novelty and one-of-a-kind-ness about those items in my wardrobe. It comes back to the idea that a lot of sewing bloggers talk about: cake vs. frosting. Cake is what you wear everyday, ordinary clothes that are maybe not that exciting to think about or make. However, for me, it's important to remember that those things are frustrating to shop for as well. I'd rather make my own cake than buy it.


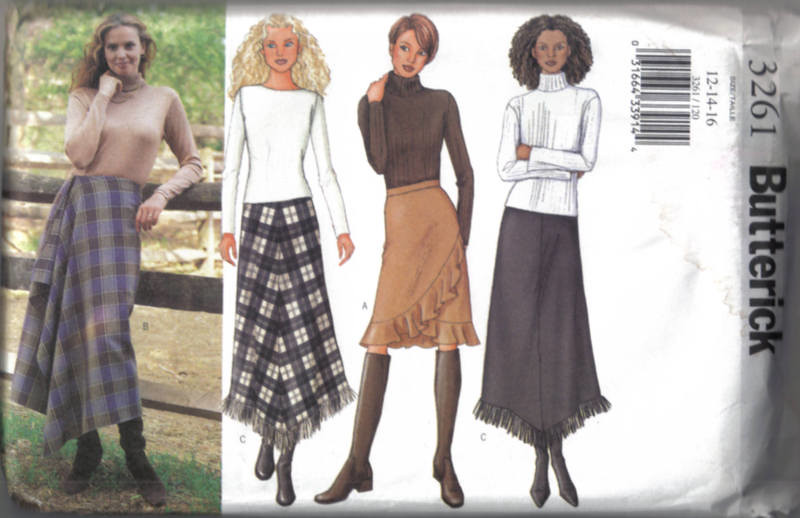
A frosting skirt -- I want 1 of view A (in brown) -- I don't want more than 1


Then there's frosting, more unique, one of a kind things that are interesting to make and wear. For a lot of bloggers, frosting seems to mean like, pretty vintage style dresses and evening wear that they don't just get a chance to wear. For me, I think frosting is going to include, yes, evening wear and stuff to wear to events, but also anything where I make a one-of-a-kind item rather than sticking to tried and true. My feeling is that my wardrobe should probably settle, in the long term, to an 80:20 ratio: if I have 10 skirts, let's say, that would mean 8 made to patterns that are easy and familiar, and 2 more trendy, unusual and one-off items that I probably wouldn't want to repeat because they are too distinctive. I guess my goal, when I've been sewing a few years, is to get to the point where in any given month I might be making a tried and true pattern to replace a worn-out or shabby garment, or add to a colour capsule in my wardrobe, and also going through what might be a more complicated process to adjust, muslin and make a brand new pattern for something more trendy and unusual.  Something comforting where I know how the end result will look, and something interesting, where I have to learn new skills, try new things, and work a little harder. Some cake, some frosting, basically.


This probably seems like I'm really thinking too far ahead -- I've hardly made any successful garments and here I am talking as though I have a completely hand-made wardrobe already. However, I learn fast and I learn well. I am confident I can get this figured out. I'm also someone who likes to structure how they learn and does best with specific goals in mind, and I'm not going to apologize for laying out A Master Plan! for getting there.

The TNT Master Plan: Part #1

I've decided to focus for the time being on absolute basic patterns for my upper body, in the hope that getting a really great TNT for a few methods of fitting the upper body that should transfer to all kinds of blouses and tops, and then also to dress bodices, jackets, waistcoats, coats, etc in the future.

I ended up dividing all the simple woven patterns I have into a bunch of categories based on how they are fitted to the body. (There are some more complicated patterns I own, but I'm ignoring them for now -- they're mainly "frosting" types, things I would only want one of)
Scout Grainline Tee -- relaxed, minimal bust shaping

Woven basics
1. Relaxed fit, minimal bust shaping (no darts/seams, may have shaped side seams)
2. Bust dart, relaxed waist/hip/back
3. Bust dart, fitted waist/hip/back
4. Armhole princess
5. Shoulder princess
6. Bust shaping with ruching, gathers, pleats


HotPatterns Sunshine: bust shaping with gathers

Then I looked at knit patterns. There's a bit of overlap. There are darted knit tops in the world, but I don't like darts in knits, so I'm ignoring them.
 
1. Minimal bust shaping (may have shaped side seams)
2. Surplice bodice
3. Wrap/Faux wrap bodice
4. Armhole princess
5. Shoulder princess
6. Bust shaping w/ gathers
7. Bust shaping w/ ruching

I decided that at a minimum I wanted to try to get a TNT in each of these 13 categories.


There are couple of problems with my plan: 1. I am currently (slowly) losing weight and anticipate that I will continue to do so for about 6 months. As a result, I am fitting a moving target, which is frustrating. On the other hand, I know exactly what my measurements are at lower weights so I know where I do and don't keep the same proportions as I lose weight (my bust, alas, retains the same upper/full/below bust dimensions proportionally, just a smaller version thereof). My feeling is that learning some fitting now won't do any harm when it comes to fitting myself again in however many months time when my weight comes to equilibrium. And I do want to sew now and not just put it off against a day that for all I know will never come when I am back to my "normal" weight. So, I'm just living with this for now and acknowledging that maybe there'll be some work done in the next six months that is not totally useful to me. 2. Fitting is HARD. REALLY HARD. This is a tough challenge I've set myself.

Colette Sorbetto from the Colette site
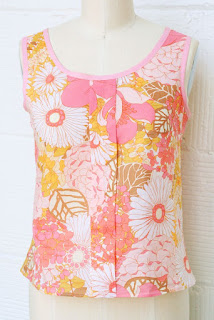
I'm not going to spell out my whole Master Plan on here, except to say that the very first Master Plan project is underway: developing a simple close-fitted block or sloper with bust and waist darts (using Connie Crawford's F/G sloper, on the basis that it's easier if someone else does some of the hard work on the bust fit). Once I have that, I am planning to use it to make the right adjustments to a Colette Sorbetto -- a simple bust darted, relaxed fit sleeveless shell. I probably don't NEED the block I'll get from the fitting shell to make a Sorbetto, but I think it will be a really useful learning exercise.

Sunday 27 January 2013

Reviewed: Lisa Lam Too Cool For School Satchel (with a bonus owl bag)

I managed to get a couple of bags finished this weekend, one for the shop and one for the Pattern Review Handbag contest! :D I do love bag-making, it's so soothing to be able to actually make something successfully rather than the never-ending litany of wadder! disappointment! wadder! fail! that making clothes is turning out to be. Still, I am persevering with it, because I remember when bag-making was a non-stop parade of horror and failure as well. Unfortunately, those tales of woe are all on my other, locked blog so I can't really prove it.

Anyway, on with the bags!
On the left: the Birds and Stripes bag; on the right, my entry for the PR Handbag contest, the Sea-farer's Satchel

I'm going to start with the bag I made to enter the PR competition:

BAG #1: The Sea-Farers Satchel, a.k.a. The 'Too Cool for School' Satchel by Lisa Lam. 

The Sea-Farer's Satchel

"Too Cool For School" Satchel -- pattern photo
My official pattern review is here, as well as reproduced below with extra photos.

Pattern Description: This bag was made using the "Too Cool For School Satchel" pattern by Lisa Lam, taken from her second bag-making book A Bag For All Reasons. The author describes it as follows:

"The design is based on the traditional leather satchel used by English schoolchildren and professors alike. There is something so romantic about old-fashioned school uniform with cute caps and smart blazers -- this style of satchel is a key part of this look"

The bag is a simple rectangular satchel with a large main pocket and a smaller front pocket. It has a long cross-body adjustable strap.

I'm a huge fan of this shape of bag and although I would like a nice leather one as well, I thought I would give making a fabric version a try. I've seen bags in this shape in Modcloth and other fashion sites recently as well. I call my bag the Sea-Farer's Satchel because the colours and the overlapping stripes put me in mind of the ocean.


Sides of the bag so you can see the front pocket and the riveted straps

Pattern Sizing: I made the pattern in the original size. Since all the pieces are very simple shapes it could very easily be made smaller or larger to suit. The main pocket of my bag is about 33cm wide and 22cm tall.

Did it look like the photo/drawing on the pattern envelope once you were done sewing with it?
Yes, I think so, although I think the one in the book is a larger version. Either that or the model is tiny, one of the two.

Were the instructions easy to follow? They are very detailed. I have to admit I barely used them though as the bag construction is fairly straightforward really. A beginner or someone who has made very few bags before would have no problem following them, although some of the sewing of the gussets might be a little tricky for someone with less experience.

What did you particularly like or dislike about the pattern? I love the shape and style of the bag and I also really like the size. I started out a bit dubious, thinking it would be too small, but it turned out larger than I expected, somehow. I was also doubtful about the seam construction. You sew the lining and exterior together of each main panel together, and then attach it, seams facing out, to a similarly constructed gusset. I thought this might look awkward -- a sandwich full of seams -- and considered changing the construction and binding the seams instead. However, I really like the way it turned out and I don't think the end result is at all bag.

The main thing I disliked was the use of sliders to close the bag. I am no fan of them on bags I carry because I find them a nuisance to do and undo all the time. I made some small modifications and substituted a twist lock. I also didn't use the suggested strap shape, only because I forgot to trace the shape and then couldn't be bothered at that point!

Original fabric and hardware pre-installation

Fabric Used: An asymmetric stripe home decor weight fabric in white, duck egg, navy and orange. I cut my fabric so not too much of the orange was in my bag, just a couple of contrasting stripes in the gusset. The bag is lined in the same fabric as the exterior, mainly because of the exposed side seams.

This bag is interfaced like you wouldn't believe. I had to alter the interfacing a little based on what was available and not too ridiculously expensive. Lisa Lam recommends heavy interfacing and an ultra-heavy double-sided interfacing that you use to fuse together the lining and exterior when they are sewn. I couldn't locate the ultra-heavy double-sided, so I used a layer of ultra heavy fusible on lining and body pieces, and then used an inexpensive medium weight double-sided fusible to bind my exterior and lining pieces together. The gusset is just lined with heavy weight. Despite the changes, I am really pleased with the outcome -- the main pieces are flexible enough to e.g. fold over for the flap, but strong enough that the bag stands upright unaided and holds its rectangular shape. Anyone making the bag though should be prepared to leave plenty of time for interfacing.

As far as hardware is concerned, I used rectangular silver sliders and rings for my adjustable strap. I also used, for the first time ever, a twist lock fastening. The one I used is in the Mulberry style, a large oval shape. I think it looks great, but installation was pretty painful as it required cutting several holes into the finished bag flap and a lot of fray check. The straps are riveted rather than sewn to the bag.


Some shots for scale -- with Flossie and with some (labelled) contents!

Pattern alterations or any design changes you made: The main alteration was to make use of the twist lock. In order to close the bag and have it cover the front pocket nicely, I needed to make the top piece about 6cm longer in total. Since it's basically a giant rectangle this was totally unproblematic.

Would you sew it again? Would you recommend it to others? Definitely, on both counts. I like this bag a lot and am very pleased with it. I think most moderately experienced bag-makers would find it easy to make and beginners would be fine so long with a little extra time and effort. It's not really a "first bag ever" bag though, just because of sewing the gussets onto the very rigid main panel.

Conclusion: A bag I am really pleased with (and one I am proud to have entered into the handbag competition!)


BAG #2: The "Birds and Stripes" Bonsai Bag

This one went straight into my etsy shop. I'm not going to do a full pattern review, but it's a cute little pattern -- the Bonsai Bag by Made By Rae. I highly recommend it!


Wednesday 23 January 2013

Knitted Object #2: The Boucle Shrug (frogged)


Boucle shrug. Why yes, it does look like a rug more than a shrug.
My second knitted object was going to be a shrug. Well, I mean, it IS a shrug, if one has a very loose definition of the word shrug. It bears a much closer resemblance to a bathmat than a shrug, if I'm honest, and I don't think I'd ever be seen dead in it. I'll be unravelling it as soon as I work up the energy.
Creating it was something I did on kind of a wing and a prayer. It's the amalgamation of two separate free Ravelry patterns. The first was a pattern for a Boucle Wrap. This provided me with the suggestion for the knitting needle size to use with boucle to get a loose open weave. It actually is much looser than this photo suggests -- the boucle aspect of it makes it look thicker and more tightly woven than it is. I got the size requirements from a Basic Shrug pattern.

However, that Basic Shrug pattern has a border and this desperately needed one as well as otherwise, as you can clearly see, the edge curls under and it looks uneven. It was also too short -- I don't know why this should surprise me in the slightest because I already alter everything else, ever, for my height, so why would I not increase the stitch count as well? Doh!

More generally though, as an item of clothing this sort of cocoon shrug just really isn't my thing. I might as well wear a snail shell for all the charm it has to me as a knitted garment. Again, I should really have realized this before I ever started because it's not like I don't know that in the normal run of things I wouldn't wear it. However, I was mad keen to knit SOMETHING, and so I hurried on with this regardless. Not my best idea.

It was FAR from a total dead loss though. There are dodgy stitches and tension problems here and there, but the knitting part of it actually went rather well. It gave me lots of practice on large, easy to use needles, and I discovered that I find knitting amazingly soothing. The nice thing is that unlike a sewing fail, where all resources are lost as a result of any disaster, with this I can just unravel and try something different another time. 

The thing I am really struggling with as a novice knitter is knowing what to make, especially since I really just don't like woollen outerwear like hats or scarves in any great quantity. I bought a pattern for a sweater vest with a nice scooped neck but now I am struggling with even making the gauge square so I think I may have bitten off more than can chew... again! Making something I'd be willing to be seen in in public seems a very long way off!

Monday 21 January 2013

Wardrobe Inventory of Doom and my style crisis

This weekend, in a fit of organizational zeal, I dragged out every single item of clothing and pair of shoes that I own. I excavated the stuff that lurks in storage boxes under my bed. I took everything out of wardrobe. I collected up shoes from all the places they had wandered to in the house. I put them all the same place, and then I went through every single thing, checked it was still in good condition, that I still wanted it and that it either fits or will (hopefully) fit when my weight gets back to normal after recent health-related dramatic swings.

Wardrobe before and after! (Full disclosure: the 'before' shot was taken in September 2012, but the situation hadn't improved in the meantime.)
I ended up with a HUGE pile of things that are going to the clothing charity box. I've always hated the idea of getting rid of something I paid good money for but that I turned out to really dislike, or that really never fit. It always felt like such a waste, even more so now I know that most donated clothing never finds another owner and just ends up in landfill. However, I bit the bullet and put my accumulated bad buys in the pile. I've had some of them for a decade. Nothing was going to suddenly make them work for me and I'm really never going to wear them. Time to let go.

I also hate throw away things that have life in them in some ways -- they are clean and whole and sturdy -- but look utterly shabby. I have kept some things to repurpose -- t-shirts to PJ tops, jumpers I wore to work demoted to wearing around the house, that sort of thing.  There comes a point though where you'd be embarrassed to be seen in something and I'll only need so many items of clothes to wear around the house out of sight of the general public once I'm working full-time again. (I work at home at the moment and can get away with wearing whatever I like.) I had a LOT of shabby, past-their-best clothes hanging about that I didn't want to throw away but also didn't want to wear. They went too, some into the charity box pile and some, frankly, straight into the recycling. I put a lot of stuff that is currently too small or out of season back into storage, except this time in a better organized way.

Everything I kept  I then recorded in a spreadsheet by size and type and season. I decided to do this after reading a post by Sarai of Colette patterns and downloading her inventory template. In the end I made my own spreadsheet because I wanted to track some extra things that she does not, particularly sizes and what fits now vs. what doesn't. It seemed more effort to fix her template to suit me than to just make my own, and anyway I love a good Excel spreadsheeting session. Her idea was to just keep track of what she owns so she can see where her gaps are and what she already owns to excess. She had too many fancy dresses. I own far too many basically identical black trousers. Her problem is probably the more enviable situation.

From recording everything, I then sorted my wardrobe out into my colour palettes in my spreadsheet and tried to imagine assembled outfits. This is is actually something I've never ever done. Historically I would always just buy clothes that were just like the clothes I had before, or that made up one single outfit that I bought all at the same time, usually for a specific event, without too much regard to what I already owned. I've never tried to make my whole wardrobe work together consciously, and frankly the only reason my wardrobe has ever worked at all is that I am WILDLY UNADVENTUROUS with colours and styles. I basically only ever wear solids and have a few really basic prints -- checks, stripes, a couple of ditzy types, that kind of thing. I only wear a very few colours. On the plus side, I have no wardrobe orphans except for one beautiful originally-very-expensive-but-I-bought-it-for-a-tenner-second-hand mint green blazer that does not go with anything else I own and never has, and which I have therefore barely worn. On the minus side, I have the world's most boring wardrobe. No, really, it's totally snoozeville.

This realization prompted me to I eyeball my fabric collection. You have to understand that I fabric shopped for six to eight months last year for garment fabric totally by instinct rather than need. I have SO MUCH fabric, so much of it in fact that I do not even want to make the total figure public, and only about a third of it is allocated to any specific project. Somehow, despite this, it's all really consistent with what I already own. It's mainly the same colours, and largely solids. Again, looking for positives, there aren't many wardrobe orphans in the making in my stash, at any rate. But on the other hand, wow, I am really boring. (What I have done though, I've now realized, is make a lot of mistakes with fabric content, based on the comparison between my preferred wardrobe and my fabric collection. Too many synthetics, not enough natural fibres. I am not going to fret about that for now. I'm still learning to sew and will ruin a lot more fabric before I'm done, and the few fabrics I've bought with a long-term, keep-it-forever item of clothing in mind are in my preferred types of fabrics.)

That barely scratches the surface of my style crisis, but suffice to say I spent way too much time this weekend trying to reach any kind of determination about what my personal style is and whether I should really care about it. There's a whole other feminist rant contained within that over the fact that there's a part of me that rejects being interested in fashion AT ALL because I need to be taken seriously in a totally male-dominated professional environment and being interested in clothes can send the wrong messages. And about the fact that there's a part of me that has totally internalized the idea that because I'm not thin (even at my lowest weight) or pretty or young, fashion and "personal style" considerations are Not For Me and a waste of time to contemplate. I'll spare you, though.

Hand-quilting practice last summer
As a palette cleanser from this excessive navel gazing, I spent some time last night working on my first (probably only) quilt. I've had it planned for ages but I am progressing at a glacial rate and am still cutting my fabric, a year later! It is a square lap quilt, and it's supposed to end up around 150cm by 150cm. I am making it Quilt As You Go style, so last night I devoted a couple of hours to mindlessly cutting wadding squares and squares of my backing fabric. I'm using a recycled fabric for my backing. It used to be a very expensive duvet cover that lived on my bed for about 10 years. Part of the fabric was a heavier Egyptian cotton fabric while the rest was more standard cotton sheeting. Eventually, the sheeting part wore thin and eventually tore at the seams in the wash. I took the heavier piece off and that is what I am using for the backing and for the joining strips on the quilt top. Yay, recycling of a much loved object!

Wednesday 16 January 2013

The Handbag Contest #1: Pattern and Materials


The PR Handbag contest is a go
Today is the start of the Handbag Contest on Pattern Review! One of my goals for 2013 is to enter at least two PR contests and given my love affair with making bags, the Handbag Contest was always going to be a good option for me. I should add I'm not doing this out of any expectation I'll win (or even that I'll get any votes!). I just think it's a good way to challenge myself. Not that bags are ultra challenging for me, but it's a toe in the water!

Those rules are pretty straightforward. It has to be a handbag (rather than a duffel bag or something), you have to use a closure, interfacing and lining, and you're encouraged to use hardware of some description. All pretty easy stuff as far as I am concerned.

Lisa Lam Too Cool For School Satchel


To be honest, I was spoiled for choice for patterns. I have so many great patterns that I've bought and I also have some design ideas I am keen to try out. However, in the end I kind of had to go for something relatively straightforward because I'm pushed for time over the next month. The pattern I chose is Lisa Lam's Too Cool For School satchel from her book A Bag For All Reasons (Amazon UK link).

I think the bag is smaller than this photo seems to suggest, based on the pattern pieces, but no matter. The bag has two sections, the main pocket and a front pocket. It has an adjustable cross-body strap and the original pattern calls for two slide buckles on the front. I ardently dislike all the slide buckles I can find to buy, so I have substituted a single large twist lock and lengthened the pattern of the flap of the bag to allow it to close properly. The bag is self-lined and I'll also be adding some internal pockets somewhere for pens, phones and so on. It's quite substantially interfaced in order to make it rigid.


I traced and altered the pattern a few days ago (the rules allow you to do that!) and pulled together all my materials. My fabric is a white and blue home dec fabric in a simple non-straight stripe. It's Ikea, but I picked it up on eBay. I previously used it to make a bag for my mum (I love that bag, actually, it's from a pattern in 1-2-3 Sew, which I recommend as a basic sewing book if you ever want one for a friend or a kid). I am using all silver hardware from a combination of uhandbag (Lisa Lam's shop, where I bought the twist lock) and Bag Clasps UK (A great shop. Really basic website, but fantastic customer service. I bought my rings and slider there this time but I've had loads of her stuff.)


Fabric and hardware for my Too Cool For School Satchel
I'm project monogamous for the most part, so I won't really be starting my bag for a couple of days because I have to finish up my second knitted object first. I've only got a couple of sessions of work before that's done though.

Monday 14 January 2013

Gifts and prizes :D

I've had a run of luck and awesome things lately!

Fashionary memo pad from Beajay
In the post just the other day I got a prize from Beajay, who sent me, all the way from Australia, a Fashionary sticky memo pad. This is a photo from the Fashionary website because the real thing didn't photograph very well. How cute is that! I am going to use it for sure. :D Thank you Beajay!


My present from B! :D Isn't it cute?

Next, my friend B who JUST got into sewing and is loving it sent me one of her very first projects as a gift. I sent her some of my early stuff when I started sewing 18 months ago, and I am super excited to have a rl friend who sews <3 (She is more into home dec and household linens at the moment, but just wait, I'll seduce her to the dark side.)


My new old sewing machine!


A much larger gift! After my grandfather died towards the end of last year, my grandmother moved in with my parents. My mum is currently clearing the house they used to live in. That was where I got my knitting yarn from, and I was also given this mid-1950s straight stitch only vintage sewing machine. I kind of love it already. It sort of works, in that everything moves as it ought to, though I haven't had a chance to get it working properly yet or oiled it or anything sensible yet. It's a Jones machine, which was a Manchester firm later bought by Brother. My grandmother was never really into sewing so it's had very little use. It weighs a TON though.


I was also given an old-fashioned cantilevered sewing box, which I love. I haven't really sorted out the contents of it yet which is why it doesn't close properly. Also I need to tighten up the screws a bit. This isn't very old -- my mum bought it for my grandmother as a gift -- but my mum has one as well so it feels like continuity with her sewing, somehow. There was a lot of rubbish inside, and also a giant box of buttons. Most of the buttons aren't very exciting, but they might still come in handy.


And finally, a knitting update. On the left, where I was up to the last time I posted. On the right, as far as I've gotten tonight. I've actually almost finished, and it's quite enormous, really. I've got 2 full balls of yarn and 2 three-quarter balls left, plus two very small balls I've set aside to sew the side seams. I am hoping to finish it this week :D
Knitting comparison! It's actually straight edged on the right, it just curled under when I was taking the photo, honest.

Next time I post, it's going to be a revisit of my radical re-imagining of my wardrobe plans.

Thursday 10 January 2013

Knitted Object #1: The Skinny Beginner's Scarf

First ever finished knitting object!
My very first knitted object is complete! It's that thing most beloved of beginner knitters, a scarf in stocking stitch. The only remotely interesting things about it are that (a) I used some balls of vintage wool from the bag full of yarn I was given. I didn't have enough for a scarf of any one colour so I used some similar seeming grey and green wool that I had a bit of; and (b) I did a sort of self-stripe effect thing with the stocking stitch.

The scarf is actually about 1.6m (1.75yds) long, but it's only like 9cm (3.5") wide
This was a total learning piece so I didn't have any expectations about how well it would turn out. However, in the end I was actually pleasantly surprised by my scarf. I expected dropped stitches, but while there are some they're not too horribly visible. I expected my "pattern" to go wrong a few times, and it did -- sometimes I couldn't remember whether I should be knitting or purling and did an extra row of the wrong one. I didn't rip back unless I went wrong mid-row, so those mistakes are still in there. I managed to pick up an extra stitch at one point and didn't notice for a dozen rows, but I left that in too. Extra stitch aside, I also expected to have gauge problems and for the thing to have a lot of variation in width as a consequence.  In reality, I did much better than I expected on gauge. The first section is pretty dreadful -- I don't think there's a consistent row in the first foot or so -- but I was still trying to relearn technique at that point. Once I settled into a technique of holding the needles and moving the thread, the gauge became LOT more consistent within the colour sections, although not between colours. The green wool seemed to stretch a lot more and it's wider as a result. Overall, I'm pretty pleased with it as my first knitted project!

In this view all my errors are much more obvious, particularly that added green stitch!
I'm already well embarked on another project, codenamed Knitted Object #2: The Giant Blobby Thing, which is actually marginally less interesting from a technical point of view, as impossible as that might seem. It's knitted on really big needles so even though it's quite large as a finished object it's progressing quickly. It's so pleasing to see the fabric of the project emerge from the needles! I suspect it will take me a couple more weeks to finish though.

A sneak preview of The Giant Blobby Thing.

Monday 7 January 2013

The Empire-Waisted Top Travails: Part #3: Failure

The first thing on my list of things to do this month was "finish my Style 3997 tunic". I'll admit that even when I wrote that, I did so dubiously as it was not so much a "finish" task as a "try to rescue" task. I have not succeeded in rescuing it, and so therefore this is a tale of woe and failure. :(

Style 3997
To recap: the empire-waisted top in question was a shorter version of Style 3997, a vintage dress pattern with armhole princess seams above the empire waist. It was intended as a sort of mashup of a dress I saw in an Ottobre magazine and a top I saw on the Pepperberry site. I spent literally hours upon hours working on getting the FBA right and pronounced it a great success at the time. Even though there were problems with the "final" garment, I still think that (almost) getting that FBA right is a big achievement and I don't regret spending that time on the pattern.

I do regret cutting out the fashion fabric. In December I wrote a post called In Potentia where I said that I hated to cut into any fabric I liked in case I ruined it, then I got over myself and cut out the top I was thinking of, and then I promptly ruined it in the sewing stage. /o\

On the positive side, things that went well:

+ The FBA is (almost) right. Looking critically at the boob region of the top, however, I think I needed just a smidge more space in the centre front piece. The princess seams are just a little too far towards the centre of the top and there's some drag on the side seams as well. It doesn't look bad, but it could be better.
+ The length is good (although, er, due to errors listed below I don't have room for a hem).
+ The colour and fabric is very nice on me. This is relevant despite the ruin of the garment because I have enough left to make a dress one of these days.

Things that didn't go well:

- Above all else, the finish, as far as I got, was AWFUL, mainly because I tried to rush through the sewing and was in a bad mood/sleep deprived/had a headache pretty much every time I picked it up to work on. Things that I needed to be spot on to make the top look polished were a mess. The empire waist seams did not match at the side. The set in sleeves were a mess. The inside was even worse because for some reason I decided not to finish my seams properly until the end, then decided to pink them, rushed angrily through this process due to frustration at something else I was doing, and promptly snipped a small but unfortunate hole into the fabric under the left bust. Lesson learned: finish is EVERYTHING. If I sew in a hurry, in a bad mood, when exhausted or headachy, I am dooooooomed to failure, and that will just make me MORE cross and frustrated, and this improves nothing.

- Pattern problems. I made some changes between the final muslin and the actual garment, and this turned out to be a terrible mistake. I thought the empire waist seam needed to be lower so I added an inch to the length of the upper bodice. What I didn't realize is that this would flatten out the curve designed into the pattern, which I liked, and also make the bodice hang unflatteringly on me, making me look pregnant. I also forgot to fix the pattern for the back skirt of the top, which was too long due to a measuring error, and when I tried to fix it I got into that awful situation where I was cutting and cutting at the hems trying to get them right, and the top was getting shorter and shorter. /o\

- Neckline fail. I knew when I was working on the muslin that the neckline was right on the edge of being wider than I like (I hate showing bra strap) but I decided I could live with it. I forgot I would be losing fabric to the facing seam as well. End result: neckline definitely too wide, shows off bra strap. Also, facings. Ugh, facings are terrible. I sat there going >:( at the facings for ages, trying to work out what RTW does instead because no, seriously, facings are TERRIBLE. They flop about, they show through, they're hard to sew on, and they add bulk at the neckline, etc. My store bought clothes don't have this problem. I reached the conclusion that RTW mainly uses bias binding instead.

- Fit problems. Apart from the FBA and the neckline issues, I also disliked the fit across the back in this version. I think I may need to look into a broad back alteration.

In conclusion:

I'm going to move on from this pattern for now, I think, disassemble the top and see if I can use the pieces for something else. I feel kind of discouraged again about making clothes, but I'm not ready to give up the attempt yet. I went through a similar stage with bags, I remember quite clearly, and now I'm pretty much capable of making any bag pattern anyone wants to give me, so this too shall pass, given enough time and practice.

The frugal side of me is disappointed by the money I spent on this failure (about £5 for the fabric, plus overheads) and the waste of the fabric, not all of which I'll be able to recycle. However, this is how I am thinking about it:

Sewing is my hobby. Of course I want to be good at it, but it's still a hobby. If I were a golfer, or did horse-riding, or played the guitar, there would be no pressure to make every pound I spent on my hobby be productive. If I played a bad round of golf but enjoyed the experience, I wouldn't go home and be all "well, I've wasted my money today!" just because the result wasn't as good as I would like. In this case, to be fair, I didn't enjoy the process of making the top, really, but the lesson isn't "I am bad at this and should totally stop all sewing" but rather "don't sew when you're not enjoying it". I think that's the thing I want to take away from this wadder, more even than the things I need to learn about fit and patterns.

Sunday 6 January 2013

Bits and Pieces #4: Money, my dress obsession, and the Unfortunate Bust Situation

1. Money
I am trying really hard to stick to a budget this year for my crafty stuff. Basically, I am giving myself a set amount per month + anything I earn from my Etsy shop, and that is it. I'd say I was successful so far, but actually it's the 6th January and I've already spent half of my monthly allowance. /o\ Sewing, why must you be such an expensive hobby? That said, half my purchases so far are minor notions I needed for knitting, which I think is probably just as ruinous. Thank goodness I got all the basic needles and some starter yarn for free!

2. Dresses, dresses, dresses

Sureau dress by Deer & Doe
My number one sewing obsession is still dresses. You'd never know it from my actual output, but I don't know, I just LONG to make a dress. About a third of the paper patterns I own are dress patterns. I always look at the dresses first in any pattern magazine. It's the first section I look at on online shops even though I don't even own a single dress due to my Unfortunate Bust Situation (see below). And yet, I have made exactly zero successful dresses, and have had two failures (one of them never made it out of "tunic muslin" status).

At the moment, my obsession is focussed obtaining the Sureau dress pattern from Deer & Doe. It's only recently been released in English as well as French. What grabs me about it is mainly the bodice, which is ruched at the bust and semi-shirtwaist. It's pretty simple, but I can definitely imagine several fabrics I have in stash made up into this dress. My biggest concern is that the pattern's a bit short looking but eh, short is easily fixable. Also, one good thing is that that there's already been a sewalong (in English, although there's also been a French one by the pattern designer). The big question is, would it even suit me? I think it would, but I'm not sure whether I am right.

What is standing between me and sewing a Sureau? To be honest, point 1: my budget. It's €12.80 + €3 p&p. I'm hanging on a few more days to see if I still really want it. I feel like I might want to earmark my next bag sale proceeds for this one.

3. The Unfortunate Bust Situation

Ugh, curse you, excessive boobage. >:( The continuing (behind-the-scenes) travails of my empire waist top have revealed that my delight over making a successful top were premature and, you guessed it, the problem is/was/always will be my bust. One of the things I've bought so far this month was sort of an admission of failure. I picked up an F/G cup bodice sloper from Connie Crawford's online site because I feel like I need help getting to a basic bodice block that works with my gigantor bust. I am not stupid enough to think the sloper will fit straight out the packet, but I figure it's got to be a better starting point than a commercial pattern based on a B-cup model. So, expect to see me work on that a LOT over the next couple of months. I want a darted, shoulder and armhole princess sloper that I can slap onto commercial bodice patterns.

And a magazine comment:

I was really interested to see that MyImage, who just announced their Spring/Summer 2013 magazine would be available later this month, have branched out into plus sizes. The magazine cover says "sizes 46-56" which is a bigger range than either Ottobre or Burda. I wonder whether they've gone the Burda route of special plus size patterns, or the Ottobre route of making 80% of their patterns run all the way up the size range. I also wonder if they've fixed their god-awful translations!


Thursday 3 January 2013

Knit one, purl one, drop one, panic

The fruits of my labours
I have started knitting! It's something I have sort of been thinking about doing for a while, mainly because some of the people whose blogs I lurk on produce such lovely knitted items. Just as with sewing, I watched my mum knit throughout my childhood. (She eventually stopped because she found it caused a lot of pain to her neck and shoulders.) I learned to knit from her when I was in secondary school but to the best of my recollection I never finished anything or even really got very far. Apparently 2013 is going to be the year that I change that. :D? :D? :D!


My tiny stash of knitting wool


The timing is pure serendipity. I've been thinking vaguely about wanting to do some knitting for a few months. Then, in the space of a few days, several different things came together to push me further along the path. My mum is involved in clearing a house after a death in the family and I was asked if I'd like a very small collection of wool and needles that were otherwise going to the charity shop. The Craftsy sale happened and I decided to pick up the Knit Lab beginner's class while it was cheap. I've seen SO MANY lovely knitted things in people's "Things I Made In 2012" round-ups and was seriously envious. I also kept thinking that the big problem with my current crafty interests is that I can't take it with me when I travel. I've been on a 2 week break from doing ANYTHING crafty just because I've been a long way from my sewing stuff.


First project: Broken Rib Scarf by Valerie Owens

As always, the difficulty is in known how best to start. So far, I've done some practice knitting along with the Knit Lab class. After watching the cast on, knit and purl classes, all of which I already knew but had more than half forgotten, I pulled out some random little balls of grey wool from the vintage stash I'd been given and cast on the skinny practice scarf at the top of the page. It's not intended to be good, or even really usable. It's just intended to get my back in practice knitting and purling and getting my tension reasonably even. I invented the "pattern" based on the Knit Lab exercises teaching you how to knit and purl -- it's basically just stocking stitch, and then reversed every four rows. (So: KPKP, PKPK, etc ad infinitum).

Once I am done with my grey wool (and I've used about half to the point you can see in the first photo) I'm just going to cast off and then keep it as my first ever knitting project. I'm hoping that when I do a round up of the things I did in 2013 I can haul it out again and be pleased at how far I've come from when I started.

It's a Boucle Wrap by Joanne Seif


I've been using Ravelry really extensively (I'm calathea243 over there) to find patterns and projects. I have a queue of four things, the first two of which should use up the bulk of my inherited yarn. First, I'm going to make a Broken Rib Scarf using the small balls of burgundy you can see in the middle on the left of my stash photo. Next, I'm going to make the It's A Boucle Wrap using the deep red boucle wool in hanks in the top left. That will just leave some random oddments of wool that I can use as scrap and practice wool, and at that point I will buy some new to make my next project. :D

The one thing I am absolutely certain of is that I really REALLY can't build any stash for knitting. I just can't. I have so much fabric, so many patterns, so much STUFF for bags and clothes, plus two other new acquisitions that I will talk about more soon, and just no. I can't stash wool, and I can't buy anything on paper for knitting. I'm going to have to be disciplined and just buy what I need for each active project as I go along.