Wednesday 31 October 2012

It Was Bound To Happen: My First Wadder

Remember this dress that I was excited about making?

M1262 from MyImage A/W 2012-13
It's from the MyImage magazine that I was ultra excited about. You might remember I made a muslin of the bodice a couple of weeks ago. Well, I went to work with this pattern and the fabric I had earmarked for this project, but instead of a dress, I ended up with an unwearable mess. :(

What went wrong?

The dress, sort of :(
I should probably make it clear I'm not really blaming the pattern: I think 90% of what went wrong is user error, and the other 10% is a relatively fixable pattern/instruction problem that a more experienced seamstress would not have a problem with. I'm not going to review the pattern formally because I don't think it's fair to post a pattern where the problems with the outcome are really my fault to Pattern Review.  (ETA: And then I decided I WOULD, because I felt like I had Useful Information to impart about fabric choice) However, this is my journal where I'm trying to think critically about what I sew and how successful I am, so I'm going to dig into what went wrong here. In fact, I'm going to divide my problems up into four parts: a. pattern flaws; b. sewing problems; c. Oh No What Have I Done! D: and d. Was this ever going to look good on me?


a. Pattern Flaws

Facings that won't stay put -- and in this shot they're pinned!
When I reviewed M1152, I said that I had a problem with the facings and didn't find the instructions very helpful in this respect. The same holds true for this dress: the facings are terrible. In particular, nothing I did, not pressing, not top stitching, not anything, convinced the front facing to lie flat and not flip open. I sewed it into the shoulder seam and into the waist seam and top stitched it and still: no way was it staying tucked into the bodice. It's a mess. If you wanted to make it, I strongly recommend finding an alternative way of finishing the neckline -- maybe just turning it over and twin needle stitching it would work better, or you could easily bind it. As I've mentioned before, the instructions are also incredibly brief. I was fine with this dress, though it took me a little while to puzzle out what I was meant to be doing with the facings, but the brevity of the instructions really puts me off trying anything more complicated from these magazines. All you really get from them is construction order, and that's fine except that for a magazine aimed at beginners that seems very limited.


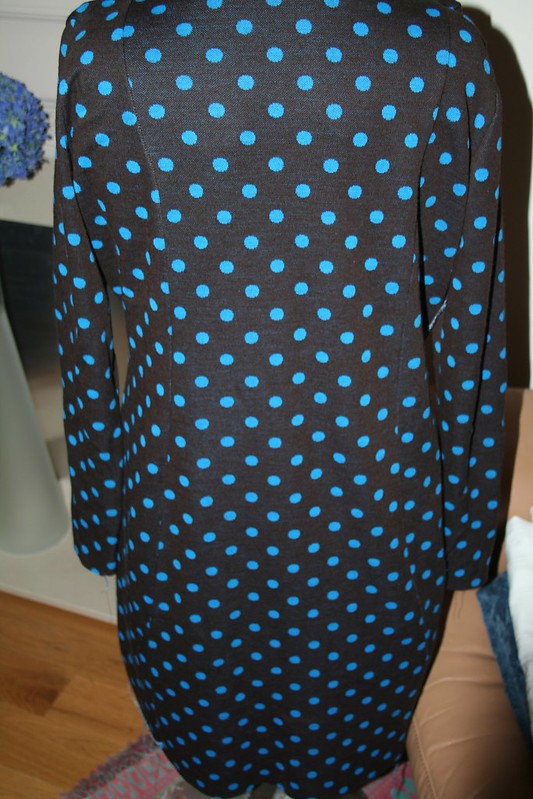
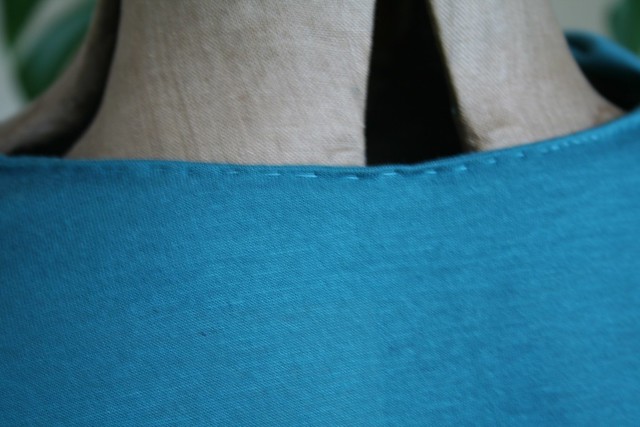
Back of dress: probably the least problematic part!

b. Sewing Problems

This is one of those "pride before the fall" things. I was so proud of how I was doing with my overlocker, but I found this really difficult. The main problem was that this was not such a simple pattern. I set up the overlocker to sew the initial seams -- so two layers of the fabric -- and was really successful with that. However, as soon as I started to sew through the extra layers of the pleats in the bodice, I came unstuck and had difficult getting it to stitch without either (a) breaking the needle threads or (b) "pulling" so that when you wear the garment, the stitches become visible on the right side of the garment. This became noticeable when I sewed the shoulder seams connecting the facing, pleats and bodice parts. However, the absolute worst seam was the front waist seam, where I was connecting the front bodice with the skirt. At one point I broke both needles in a single stitch, and I still have no idea how or why. I also, somehow, screwed up sewing the back and front in such a ways that not one of my hems matched, even though they should have. To make the even, the skirt was going to end up way shorter than I expected or like.

These problems caused me to get so frustrated that I started trying to ram the fabric through the overlocker, and...
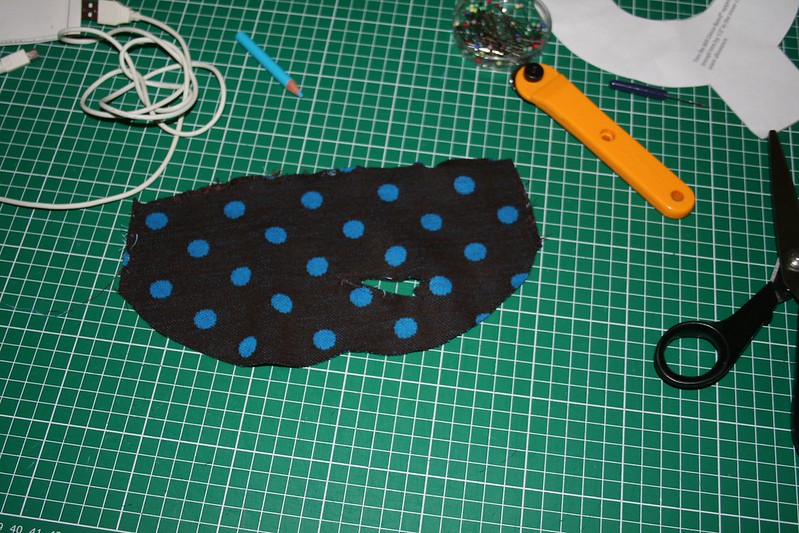

Oh noes! A hole D:
c. Oh No, What Have I Done! D:

... I managed to accidentally catch part of the skirt in the front waist seam D:. Since I was overlocking, I cut a huge hole in the fabric in the process. The piece I caught was a few cm into the upper part of the centre front panel of the skirt. I only had 2m of this fabric so I really didn't have enough fabric to recut that whole piece, and I ended up doing the most insane thing ever, and cutting a semi-circle and replacing it. I did this on the theory that the front is already seamed and it made more sense to me than any of the other alternatives that I came up with. At this point, I'd experienced enough problems with the dress that I'd already decided that at best, it was going to be a lying-around-the-house dress, so I wasn't too worried about the design, although this was really the point where I started to think that this dress was a wadder. Also by this point, I'd started to ask myself:

d. Was this ever going to look good on me?

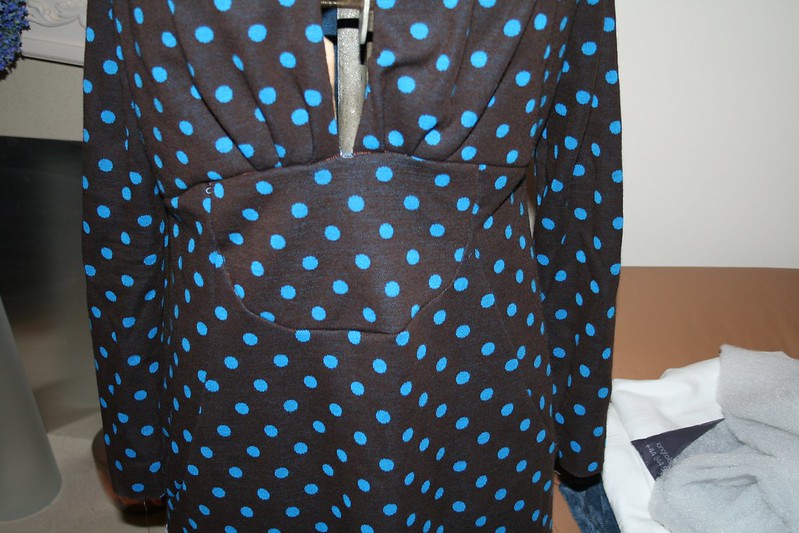
The 'hole fix' -- also visible, the "pulled" seam stitching
The strangest thing about this question is that, looking in the mirror, I don't hate this dress. Looking at the photos I took for fit purposes, I absolutely loathe it. Some of it is that (for reasons of long-term illness) I gained a huge amount of weight recently and it distresses me to see that reflected in my body. My confidence in my body image is shaky at the best of times and absolutely rock bottom at the moment. It is very challenging to confront photos of myself, since they tend to be less flattering for all sorts of reasons.

Dress, as modelled by me -- observe the neckline problem
However, apart from that, I also have the problem that (a) I am not sure this was ever a good colour/pattern combo for me; (b) I am not sure the design, which emphasizes the bust so strongly, was ever really going to suit me. It really shows off that I have not very much waist at all. Even at my lightest weight, I don't really have much of a waist -- it's just not the way I'm built.

I also have some fabric issues. This was a heavy weight cotton blend fabric. I wore it for about 4 hours after I made it even with the crazy wonky hems, because I wanted to get a sense of what it was like to wear and whether the facings would behave (answer: no). The fabric was so heavy and didn't breathe as well as I expected, so I spent most of the day feeling hot in the long sleeves, and cold where the neckline gapes open. It would definitely be a depths-of-winter dress only.

What next?

There are so many problems with the dress that I could fix -- I could resew some of the seams that have "pulled" or have little problems, hem the sleeves and try to do SOMETHING with the facings to get them to lie flat. For the moment though, I am kind of burned out on this dress, so I've decided to leave it, and the pattern it started from, alone for a while and move on to something else. I do think it could still be rescued, but I am not in the right frame of mind to think about it for now. I am bummed that it went so badly, I have to admit, because I loved the idea of the dress and I really dislike the waste involved when I made a muslin and then a wadder -- I've easily spent £20 making this dress and yet I do not have a dress to show for that money or the time and effort. :(

A couple of positives

On the plus side? I know a little more about MyImage patterns. I know a little more about my overlocker and how to sew. I was reminded all over again that no, really, don't sew when you're tired. Don't sew when you're frustrated. Better to stop when you want to throw it out the window than keep going and ruin something you've spent money on. If only I could actually just LEARN from those mistakes, instead of making them over and over...!

Wednesday 24 October 2012

Knits That Fit #5: Reviewed: My Image 1152 (Draped Neck Top)

MyImage 1152 Draped neck top

M1152 Technical drawing in My Image A/W 2011/12

The first MyImage magazine pattern (and my second knit top) that I've finished is M1152, a long-sleeved tee with draped neck from the Autumn/Winter 2011-12 magazine. The photos of this top in the magazine are actually not very easy to see for the most part as the first two iterations are in black and a busy print. The best image is probably the mustard coloured top on page 22. I actually don't know that I would have even thought of making this top based on the magazine photos, but when I was glancing through the various My Image pattern reviews on PR (there aren't many, so it was hardly an arduous task), I saw this particular pattern had several positive reviews. It seemed like something that was flattering AND that was widely touted as something that was quick and easy to make, which is precisely my sort of pattern.


My first impression of the MyImage magazines has mainly been confirmed by making up this pattern. Tracing the patterns was easy and very like the experience of tracing from Ottobre. I really appreciate the use of white paper to print the patterns on and the use of coloured lines in both magazines. On the negative side, the instructions are by FAR the worst thing about the magazine. They read like they've been written in one language and then translated, inexpertly, into another -- which is probably exactly what happened, since the creators are Dutch. I'm sympathetic to the situation those creators are in, and I gather it's improved in the more recent magazines so I'm not letting it put me off. Still, it's the first, and probably last, time I've seen the word "extrude" in a pattern instruction! The instructions are also INCREDIBLY brief for a pattern magazine intended in part for beginners. I can't really talk about sizing yet until I get a sense of how consistent it is over several patterns, but I'm encouraged so far. There seemed to be a good match between my measurements and the garment, anyway.

One-armed muslin
I talked about making a muslin of this pattern last week in the hideous turquoise floral fabric because I was really doubtful about the draped neckline. I really loved it when I tried it on though, although the limited stretch in this jersey meant it was way too tight across the bust. I also wanted to practice setting a sleeve, which turned out to be terrible because (a) I put the sleeve on the wrong way round (oops) and (b) while faffing around looking in the mirror trying to work out what was wrong with the sleeve, the doorbell rang and I had to confront the postman while wearing a top in floral turquoise and one sleeve. /o\

My main learnings from the muslin process were therefore that (a) I needed a stretchier fabric or an FBA; and (b) I needed to set the sleeve on the flat, both of which I successfully incorporated into my finished top. Also (c) DO NOT ANSWER THE DOOR IN A ONE-SLEEVE TURQUOISE FLORAL TOP.

Here is my pattern review from PR (although you can also read it there), plus some extra notes on costs and nit-pickery at the end:

Unattractive shot of me wearing the top :|
Pattern Description: Top with long sleeves and cowl neckline. Taken from the Winter 2011-2012 issue of My Image magazine.

Pattern Sizing: 34-44. I made a size 44.

Did it look like the photo/drawing on the pattern envelope once you were done sewing with it? Yes, just like it.

Were the instructions easy to follow? The instructions are extremely brief and were obviously written in Dutch first and then translated. This translation, it has to be said, is not entirely successful. However, it's a pattern with only three pieces so you don't exactly need the War and Peace of instructions in order to put this together successfully. For the total novice, it might be a bit baffling. For anyone who has made even just one t-shirt before (as I have), it's fine. I did make some minor adjustments to the order in which I did things: in particular, I chose to sew the sleeves in on the flat before sewing the side seams.

What did you particularly like or dislike about the pattern? Before I made it, I was most doubtful about the neckline. The draped neckline is not a look I ever normally wear as I am very full-busted and it can make me look even bigger. However, having made it, the neckline is my favourite thing about the top. I also love the sharp indent at the natural waist, which is a really flattering shaping for me.

Hand stitched back facing of neckline
I emphatically dislike the back facing at the neckline, which took ages to wrangle into place using their method. Eventually I had to hand sew it in place to stop it from flapping about. When I make this top again, I will maybe bind the back neck rather than face it.

I am also not sure about the drop shoulders. It's supposed to look like that according to the technical diagram, but as I have wide shoulders anyway I'm not sure it's the most attractive look.

Fabric Used: A lightweight cotton jersey remnant in a turquoise/green. I had a piece about 1.5m square and used all but a small scrap.

Pattern alterations or any design changes you made: I added 8cm to the length of the top and 3cm to the length of the sleeves as I am tall. I left off the elastic intended to ruche the side seams at the hem.

I also added an extra 1cm to the side seams to give myself a smidge more room at the hip and bust. I originally made a test garment of this top in a little piece of jersey fabric with 20% stretch that I had lying around, just to see if I liked the draped neckline. In that fabric it was tight across the bust and would have benefited from an FBA. This version, in a soft, much stretchier cotton jersey was fine without an FBA. It fits about as well as many a RTW knit top I have, but I think I could make it fit a little better in the next iteration with a few adjustments.

Would you sew it again? Would you recommend it to others? Yes, I already have plans to sew it again. I would definitely recommend this top as a very quick and easy top with a really flattering shape and neckline.

Conclusion: Really love this top and suspect I will be making several of them!

Extra notes:

Fabric costs: I bought my 1.5m square piece of fabric for £3.50 including p&p from eBay. It's not a very heavy jersey but not worse than the typical LTS or Land's End long-sleeve layering t-shirt (of which I have several). Other than that, my costs were pretty much confined to normal thread and other overheads. However, I also made a muslin, using about 1m of the floral jersey fabric. That cost £3.50 per metre including p&p. Plus, I managed to prematurely break my twin needle making this top and had to replace it, which cost £2. So assuming 10% for overheads, I spent about £10 on this particular top, excluding labour costs and pattern costs. As a point of comparison: LTS have a very similar top for sale for £26.

Nit-pickery (or, where I critique my sewing):

+ I am ever more confident about my overlocker use and was thrilled by quickly I was able to construct the garment using it.

+ My overall construction of this top was good, and the one or two places it went wrong (back neck facing) are not things that I am worried about and moreover, are easily fixed in the next attempt at this pattern.

- Annoyingly, I thought about this when I was making the muslin but didn't transfer my thoughts into action for the real thing: I needed a little extra room in the upper arm. I need to look up what that adjustment is and make it before I make this top again.

- This is REALLY nitpicky, because the fit on this top is as good as anything I've had in RTW knit and no different from many I wear every day: I probably could have gone with a small FBA instead of the side seam addition. I did TRY to do an FBA but came unstuck rotating the dart into the cowl neck. I think I have sussed out what I have to do though now, and will give it a try on the next iteration.

Saturday 20 October 2012

Made: Giant grape-coloured snuggle scarf


I really love scarves. I love making them, which is why I have 4 catch and release scarves that I've made (including one very recently). I love wearing them, which is why I have a million others that I've bought here and there (I have two I wear ALL THE TIME in winter that are alpaca scarves I bought in Peru.) Currently on my shit list though: Long Tall Sally. I love their scarves because they're long and they have great prints, and I like that they sell them off for £4 each at the end of every season (I am not willing to pay £20 for a scarf. I am TOTALLY willing to pay £4 provided I am buying other things at the same time). I MOST DEFINITELY DO NOT LOVE that they douse their scarves in probably-formaldehyde-or-something-equally-vile to keep them looking nice on the shelf, to which I am HORRIFICALLY ALLERGIC. I bought 3 new ones recently and even after I washed them twice in the washing machine I still had an allergic reaction to whatever the hell they put on them. I had to wash them another 2 times, AND I still spent 36 hours Wednesday-Thursday this week looking and feeling like my skin was going to fall off. Ugh. Making my own is SO MUCH LESS HAZARDOUS.


ANYWAY, to return to my sewing, I really love scarves and on Friday evening I wanted to do something completely easy and undemanding while I thought my way through an academic problem. I ended up making this giant snuggly purple knit scarf. Remember my Kirsten Kimono Tee in purple? I complained in that entry about how when I bought the fabric I didn't get what I expected. I THOUGHT I was buying "3m of purple jersey" from eBay and it really WASN'T when it turned up. It was two different pieces, one 1m x 1.5m wide 2-way stretch jersey -- just big enough for the KKTee -- and one piece of ulllllltra stretchy 4-way stretch jersey that was about 1.5m long but only 1.1m wide. I thought about making another KKtee out of it, but it was just SO STRETCHY I don't think it would have stayed in any kind of shape at all.


Instead I more or less made a Pleated Knit Scarf, except I was 100% less careful and meticulous about my pleats and sewing than the author of that tutorial. I love it though, it's so cuddly and warm, and PURPLE which is my new most favourite of all favourite colours. (I've always loved it, but I am having a purple renaissance, apparently.) Costs: £3.30 including p&p for the fabric, plus overhead/thread, so probably pretty much on a par with the £4 + p&p I routinely pay at LTS, but MINUS the hives and inability to swallow due to allergies. I call it a win. \o/

Friday 19 October 2012

Knits That Fit #4: Test garments

In the ongoing Search For Knits That Fit, I decided this week to make a couple of test items for two MyImage magazine patterns using a positively hideous knit I bought right back when I was just starting out buying garment rather than bag-making fabric.

M1262 (images from My Image magazine A/W 2012)
The first pattern I worked on is one I've already mentioned: My Image 1262 from the A/W 2012 magazine. This is a jersey dress with a low V neck that would definitely need a t-shirt or camisole underneath in order to be respectable! There are several incarnations shown in the magazine, but this grey one, and a red and black jersey print (on p. 16 if you browse the magazine at the link above) are my favourites.


Test garment: tunic length M1262
What I liked about this dress in particular is the neckline and the design seam lines on the front and back. My concerns were first that the magazine is really inconsistent as to where it shows the empire line bust seam. On some models, including this one, the seam is mainly below the bust. On others, it seems to almost cross the bust point. It didn't leave me very clear on what I should expect if I made it up. Also, the magazine seemed undecided if this was a style that needed a belt for shaping or not. I don't have the figure for belts (no waist, basically) so I never wear style that really need the belt for the look.

For my test garment I made a weird size 44/46 hybrid and also gave myself massive seam allowances, which was a mistake because of the way the dress is put together. I left all all the facings and sleeves, and, as you can see, I cut it to a sort of tunic length so that I got the bust/waist/hip fit but didn't bother with the rest of my lower body which doesn't need any special fitting.

Before I started, I did an FBA on the two front bodice pieces and rotated the extra fullness into the pleats at the bottom of the bodice. However, when I made it up, it was self-evidently far too big, so I cut the front bodice off, re-traced a straight 46 and sewed it on. To my amazement, it was fine without provided I used wider side seams. Other than that, my main changes to the muslin related to pulling in the side seams below the bust (where I am narrowest) to give myself slightly more shape.


The final dress should be in the lilac fabric second from top
On the "real garment" I am most nervous about the back neckline (though I think most of the gapping is because I stretched it out by mistake), the sleeves (see below) and the fit of the bust, so nervous in fact that I have yet to even cut it out. My new mantra though is "THERE WILL ALWAYS BE MORE FABRIC". I'm so hyper aware that I could easily use everything I have of a fabric and still produce nothing wearable from it that I feel reluctant to cut into ANYTHING that I actually like, but I am trying to make myself be brave and just do it. Worst case scenario, I wasted some money on fabric but learn something important, so I should just get on with it. The fabric ear-marked for this dress is a self-patterned lilac synthetic knit. It's a similar weight and drape to this hideous turquoise, but it is probably very slightly stretchier. I'll probably end up cutting it out this weekend.


My Image 1152 (image from A/W11-12 magazine)


While I was worrying about cutting into my "good" fabric for my jersey dress, I decided to make a stab at a second My Image pattern, M1152 from the A/W 2011 magazine. This is one of only a couple of My Image patterns reviewed several times on PR, where it's called the "One-Hour Top". I decided to make a test garment not because I was concerned about the sewing, which genuinely is easy, if not quite a one-hour project for someone at my skill level, but because I wasn't actually sure if this was a style that would suit me. Like many large busted women I've fairly religiously stuck to a NO COWL NECKS approach because they often look terrible. I had one once that ended up with like, a pile of loose fabric sitting on top of my bust like it was a shelf. NOT attractive. 


This top though I REALLY like in this fabric. It's way more flattering on than I anticipated. The pronounced waist shaping is great, the neckline looks really good on. I added about 5cm to the hem but it needs at least another 5cm to be my preferred length + hem. The sleeve was my first attempt at a set in sleeve and, uh, I won't be doing that again. I'll be sewing on the flat next time!

HOWEVER, I ran a size 44 (the largest size) in the same hideous floral jersey because I had 1m left and that was really all I needed for the bodice and one sleeve. This, however, was fundamentally stupid because the stretch and drape of this floral is TOTALLY different to the fabric I plan to actually use. I definitely needed an FBA in this fabric (it was VERY tight and had massive drag lines across the bust) but I doubt I'd need more than some extra space at the side seams in the softer, more stretchy cotton jersey earmarked for the top. So I'm not sure how much making it up taught me, other than that sewing sleeves is HARD and that (probably, depending on how much the softer fabric changes the drape of the neckline) this top will suit me. Luckily, the fabric ear-marked for THIS project is an inexpensive remnant of cotton jersey, so I don't feel too worried about cutting into it.

The big problem, of course, is what the heck to do I do with my leftover test garments now?

Wednesday 17 October 2012

Reviewed: Simplicity 8664 (Straight skirts) Again!


Simplicity 8664 version 2 (horribly blurry photo, good grief, but I don't have time to re-do it)
I decided, after some thought, to go back to the beginning for the fifth and final skirt of my winter work wardrobe. I previously made view B (ish) of Simplicity 8664 and really liked it. This time, I made view A, which is the one in yellow in the upper right of the pattern envelope image, with a slit in the front of the skirt rather than the back. This time I didn't peg it, so it's just a straight skirt rather than a pencil skirt. I also did NOT do the "optional embroidery" though I can see how that would be cute on a skirt intended for summer.


This is not a sexy model pose, this is an attempt to show the vent!


The main difference between View A and View B is that the vent is offset on the front of the skirt. I probably should have made the vent slightly shorter as when you sit down it does end up rather high on the leg, but it's not indecent and I quite like it. Still, anyone else making it should consider how high they want to show off their legs, with particular reference to how high it ends up with they sit down (spoiler: higher than you expect).


Skirt lining


The fabric I used for this one is a wool blend from eBay, of which I bought 1m. Have you ever started something and then thought: good grief, WHY AM I DOING THIS? That is how I feel about this fabric. The description said "heavy, but will need lining", which I was going to do anyway. Then it arrived and, frankly, it was see-through. SEE THROUGH WOOL. WHY. But because I'd spent money on it and I need a black skirt and I couldn't think what else I could do with it, I soldiered on. I washed it. It shrank horribly. I cut it out. The material moved about weirdly and literally crumbled at the edges when I cut it. It wrinkles if you so much as look at it. It stretched and warped as I sewed it no matter how careful I was. Overall, it was a mess. The lining, on the other hand, I really like. It's just a poly satin but I love the crazy pattern and having an interesting lining on what is otherwise a very staid skirt. As before I interlined/seam finished with this lining rather than doing a straight lining.

Back of the skirt on Flossie


Cost-wise, the fabric was £6 including p&p for the wool, and the lining was a remnant that cost £3.50 including p&p. I had nothing left of the wool but a nice piece for bag-making left of the lining fabric, which I have therefore transferred to that stash. It has a zip, for which I paid about 50p. So I would guess my materials costs were around about £10 for the skirt.


Nitpickery: 

- Overall I am disappointed with this skirt, not because it's unwearable or anything, but because of the finish I got on it. I was trying a few new things with it and not all of them worked (most especially not overlocking the interlining, which suffered for my lack of overlocking experience). There are so many places with little flaws that are difficult to fix. It's not worse quality than skirts I've bought before, but it's not great either.

- The fabric is dreadful. I'd actually be stunned if it survives more than a few washes because it wants to stretch and warp and crumble so much. I ironed it and pressed it and ugh, NOTHING wanted to make it look good. I wore it for about 15 minutes to take photos, hung it over a chair while I changed and came downstairs to photograph it on Flossie and it looked like I'd screwed it up in a ball and sat on it.

+ I got the interlining technique spot on this time, and I love the fabric I used for it. If it doesn't work out as a skirt I'll harvest the interlining and see if I can use it for something else, I think.


Thursday 11 October 2012

MyImage magazines 2011-2012

My MyImage magazines arrived this morning in the post! I spent some time looking through them and thinking about what I want to make. This is the first time I've picked up the magazine after Melissa at Fehrtrade offered a coupon. She has reviewed the magazines and made up a few garments from it previously, which is how I knew about it (I am the absolute worst lurker on other people's blogs, seriously).

I thought I would review the magazines at first look generally before I make anything. As I'm a relative beginner to sewing garments, I guess I'm trying to give a beginner's perspective on the magazines and (eventually) on making up the patterns in them. Of course, you can also make up your own mind by looking at the online version of the magazines and the line drawings. This got really long, so click the jump cut for more!

Wednesday 10 October 2012

Bits and Pieces #4

1. Yesterday was a mini new experience: I wore my purple t-shirt out of the house. I've been concentrating up to this point on making things for my future workplace, and before that I made PJs. This is the first time I've actually been out in public in something I sewed for myself. It's kind of an artificial thing to say -- I've been carrying bags I've made for myself for over a year, after all -- but it's still a teeny tiny milestone for me. :D

Olivia pattern by ChrisW Designs
2. I've definitely decided to make an Olivia bag for my sister-in-law for Christmas. Now I just get the fun part of choosing fabrics etc! I thought about using a lightweight grey denim I have, but I just don't think my machine will cope with the layers you have to sew through in a bag like that if I do it in denim.


One of my new patterns

3. I got some New Look patterns in the current (UK) sale: a dress, a jacket and a knit co-ordinates pattern. I really like the look of them, but wow, I really need to STOP BUYING PATTERNS. I have enough already (... except I will still get the pattern magazines /o\). Speaking of which, I am still waiting for my MyImage magazines which I am really looking forward to looking at in more detail. Definitely have ideas about what I'm going to make from them. I'm also looking forward to the new Burda this month since I think there are some great patterns in it, though as ever the Plus garments look a little sack-like, alas. On the plus side, I did manage to cancel my Sew magazine subscription just before it renewed, so that saved some money.


 4. I cut out my second Simplicity 8664 skirt, although a different view this time. I already kind of hated the black wool that I bought to make it (shrank, smelled funny when washed, extremely thin) but now I really hate it after it was just horrendous to cut. I am not hopeful about how awesome it is going to be to sew AT ALL.

Sunday 7 October 2012

Knits That Fit #3: Reviewed: Kirsten Kimono Tee

Kirsten Kimono Tee, as modelled by Flossie
This weekend, even though I had (conservatively) five billion more important things to do, I steeled myself for the challenge of actually making a knit garment rather than just talking about it. I tried SO MANY new things to get this t-shirt sewn up that even though the finished product is imperfect I'm really proud of it. My new skills: I used my overlocker to construct seams for the first time; I sewed using a twin needle for the first time; and just in general, I sewed a fabric with stretch for the first time.


Side view


I have to admit straight away that all of my fabric use planning in my previous Knits That Fit post was completely wasted, because when it came down to it I totally changed my mind about what to make. It turns out I am the LEAST good at advance planning in this respect. /o\

I really REALLY love this t-shirt. I am absolutely willing to wear it outside of the house. \o/


Maria Denmark's Free Pattern

I did stick to plan in that I did use the (FREE) Kirsten Kimono Tee pattern (Craftsy link -- you can also download it other places including PR) by Maria Denmark. My review on PR is here if you're interested. Here's all the rest of my mumblings about it though:

Being a veteran of bag-making from patterns I buy online, I have no problem downloading and printing patterns. I can't say putting it together was tremendous fun but nor was it especially painful, especially since the pattern author made a good effort to make it easy with little target circles in the corner of each page.

Slightly more of a nuisance is that you have to add your own seam allowances. I added mine on the pattern paper using a seam gauge ruler, as I tend to with Ottobre, as I am hopeless at eyeballing distances when I am cutting. I also lengthened the t-shirt by 6cm.

The instructions are minimal but probably perfectly adequate for anyone who isn't, well, me. I had NO IDEA what I was doing, really, in terms of which machine (sewing machine or overlocker) I should use when and how, and how to avoid my fabric being eaten by the needle and so on. I ended up doing quite a lot of reading around in my books/on the internet to get started and keep going. I am definitely not faulting the author for her instructions! However, the instructions alone were not enough for me to make the tee successfully. I used a combination of Dixie DIY's Never Fear Knits posts, Sew U Home Stretch (Amazon UK link) and other random bits and bobs from around the internet to help me.

Pile of purple jersey
The big difference between my plan and what I actually did was in my fabric choice -- I originally meant to use a red and white print, but ended up using the fabric at the bottom of this photo, which was a two-way stretch cotton jersey of unknown origin in Cadbury's Dairy Milk purple. I used all of the ~85cm piece that I had. I probably didn't complain about it when I bought it (from eBay), but I really should have since the description was misleading, the p&p overpriced, and the fabric was marked and a part of it was therefore unusable. My fabric costs were about £3.50, though, which is hardly earth-shatteringly expensive, and I am quite happy to have spent that on what was basically a learning experience garment.

The nice thing about making t-shirts is that really, even if they don't look great, you can always wear them as base layers or nightwear. Mine might even end up as a camisole type top under the dress I plan to make with the lighter purple fabric second from the top in the photo above.

Nit-pickery (where I critique my sewing):

+ Let me just say this first: MY FIRST KNIT GARMENT: DONE \o/. Glad to get that first thing over with.

Check out my twin needle stitched hem \o/
+ Using the overlocker was GREAT and also REALLY EASY. A few things were a little frustrating but not worse than when I was learning my sewing machine. I feel like I came a long way in understanding using my overlocker really quickly, and I still haven't done my online class!


+ Using the twin needle was also really fun and easy. I worried that I would wander away from edge, but I didn't wobble off it even once. I did use a 4mm width though, precisely because I was concerned about this. It's probably harder if you use the narrower 2mm needles. Still, I love the way that worked out.

- There is a ridge in my twin needle work. I think I needed to play with my settings more (longer stitch length? use my lower tension bobbin case?) or think about stabilizing the seam. It ironed out a bit, but it's not great.

- Curves on my overlocker: not a thing of beauty OR a joy forever. I re-did the underarm seam like 4 times and it's still crap.

- The worst thing of all is the neckline binding. I think I should have cut it out differently, for a start. But also, it's such a MESS right at the front where it's really visible. And, stupidly, I used stitches too small to unpick, so I am stuck with it. Ironing helped a LOT, but what would have helped more was more pinning and more thought before I started sewing. Luckily, I think the next knit pattern I am trying has facings, so it will be less painful (I hope).

Friday 5 October 2012

Mainly about magazines, in bullet points for some reason

1. I'm suddenly absolutely in LOVE with MyImage, which is a Dutch pattern magazine very similar in format to the Finnish Ottobre Woman (which I also love to pieces). I had looked at the magazine briefly before, but when the blogger at Fehr Trade provided a 20% coupon (scroll to the bottom), PLUS all the back issues were on sale, I splurged and bought the four issues that they have in stock (S/S 2011 and 2012, and A/W 2011/12 and 2012/13), even though the postage was dreadful. Since then, I've been gazing raptly at the browsable online magazine and at the technical drawings, and doing so has caused me to revise elements of my knit items sewing plan. More on this once the magazines actually arrive, I am certain. (I'm also in love with three of their pattern envelopes, but ugh, I've bought way too much this month already.)

2. The more I think about it, the more I realize I am really probably not a Burda Style type of person. I mean, it probably won't stop me buying the magazine, but I am pretty sure I am just not that trendy. I can't really say "but I never make anything!" because on present evidence I don't make anything out of anything I buy. But I do wonder how much I will ever make out of Burda Style. I definitely think Ottobre and now Image Wear are probably more my speed. It doesn't help that in Burda I straddle the regular/plus size line, and the plus clothes recently have mainly been hideous sack-like affairs.

3. The one I am definitely NOT buying any more of is Sew magazine, which I subbed to for a year early last spring. Ugh. Yes, you get a free pattern some months and I've quite liked all the patterns I've acquired that way. However, it's horribly advertising heavy and I could not be less impressed with the content if I tried. Plus, the reality is that eBay floods with the free patterns for months afterwards so I am pretty sure if an issue comes with a pattern I want attached I'll be able to get it.


4. I'd really love to get a better look at Patrones, Manequim and Knipmode, but sadly you really can't seem to get single issues anywhere except on eBay and then they sell for stupid amounts of money. I think my Spanish will hold up to Patrones but I'd have to use Google Translate for Manequim and Knipmode. Of the three, I'm more attracted to Patrones I think, but I'd want to see it before I buy a 1 year sub.

5. None of the mainstream non-pattern sewing magazines appeal to me at all. I've looked at Sew Today a couple of times at the newsagent, but I've never actually been moved to buy it, which kind of says it all.

Tuesday 2 October 2012

Knits That Fit #2: Colours and patterns

I have a lot of fabric, but I actually only have three colour palettes in my total fabric stash and everything I have bought fits into one of them, more or less. I'd love to say this was totally planned and deliberate, but actually it's because I only like wearing a very limited number of colours and so that's all I buy. You're never going to see me in yellow, for example, or orange, or pink or a lot of pastels because my skin tone is yellow-ish and they make me look like death. I like saturated colours and high contrast because I have very high contrast colouring (dark brown hair, dark brown eyes, ultra pale white skin). Generally, I keep all my crazy colours and prints for my bag-making stash. I don't dislike wearing prints, but it's always been tricky to get prints I like that happen to be on garments I like when I go shopping, whereas solid colours are easier to find.

Going back to just my garment stash, these are my three colour palettes:

1. Brown/beige, red and green (not red and green together, but each paired with brown/beige)
2. Black, grey, white and purple
3. Blue and turquoise

Believe it or not, this description represents my new, broader range of colours. I went for years wearing literally nothing but black, white and blue. Then I lost a lot of weight and did a wardrobe makeover, and this is what I moved on to. Not a BIG improvement, I have to admit, but it's more than I used to wear. The nice thing about these palettes as they stand is that they do cross over as well. I can wear red with black, and green with grey, and turquoise with brown or black or grey, and so on. I like to wear neutral "bottoms" and keep colour on my upper body.

The next part of my sewing plan is all about knits, especially knit top layers. I'm thinking short and long-sleeved tops, cardigans, wraps, etc. For the time being, because my blue knits are a bit overwhelming in number, I am going to concentrate on colour palettes 1 and 2, which I have fewer of overall and more ideas what to do with.

Colour palette 1: Brown/beige, red and green.

I don't have many knits in this category really. I don't wear brown/beige next to my face much and though I'd really like a nice forest green or a sort of dusty sage knit, I haven't found a colour/price combination that I like yet.

What I do have is two red cotton jersey knits, which I LOVE. I'm going to make the free Maria Denmark Kirsten Kimono Tee out of the print. I have 2m and the pattern only requires 75cm, so I should have enough for something else in the future. I'd like to make Simplicity 2369, the wrap top, with the red solid but I am not sure I have enough skills for that pattern yet. I paid a bit more for this knit, so I will definitely muslin first.


Colour palette #2: White, black, grey and purple.

The top fabric is hard to make out why it's in this category, but those dots on the cream background are actually little grey/silver squares with a tiny bit of sparkle. I am going to make view A of Simplicity 2773 with some of it (I have 4m and that pattern only requires 1.5m). Then, one of the two small purple pieces is going to be the little wrap top in the latest Ottobre and the other I think I will make into another Ottobre top (without the little rose things though). The figured piece of purple, of which I again have masses, I LOVE. There's a part of me wants to make a jersey dress from it, because the drape is so beautiful, maybe the dress version of Simplicity 2369, but that seems maybe a bit ambitious as well. It's hard to tell how hard that pattern is, and my big problem is that I think I need to grade between sizes, and I am right at the very top of the sizes that are in my envelope, and a second envelope would be another £10. :|

Meanwhile, I have eight different knits in my blue/turquoise pile, most of them quite large pieces. I've really got no idea what to make with any of them. I have one small dark turquoise which could be a repeat of either of the Simplicity patterns if they work out. My favourite is a huge 5.25m piece of figured silver and duck egg blue. It's so thin that I don't know what it will make that won't be indecent, though it too would make a fantastic dress of some kind as it drapes so prettily.

However, I am (still!) waiting for my overlocker ball point needles -- they are now telling me they are out of stock, which is irritating. So while I am thinking about all these knits, I can't actually sew any of them! I do need to get on with my black wool skirt. It's going to be a bit of a squeeze getting the skirt out of the fabric, as it decided to shrink horribly in the wash.