There's a certain type of top I really like: it's empire waisted, curves in below the bust to emphasize the waist, and then widens to a skirt over the abdomen and hips. I have several versions of this style of top -- some are classic shirt style, some are more tunic type as in this blue Pepperberry top. I really wanted to make one, and maybe find a dress pattern in a similar style.
This is the long, painful story of my attempt to make one. Or at least, part 1 of it. I almost feel like I should apologize for how incredibly long-winded I am, but I don't actually care. There are so many really accomplished seamstresses writing blogs. There are hardly any hapless beginners. I am filling a niche! Long-winded hapless beginner! I don't even care if nobody reads my blog. At least a chance met hapless beginner may one day stumble across me and take comfort.
Here, then, begins the story of the The Travails of the Empire Waisted Top.
My inspiration for this top is the Pepperberry top in the photo, but I wanted to start more simply. Dissecting the top for what I wanted to make I came up with this list:
The most important thing I wanted to replicate: the overall shape.
Too complicated for now, even if I like it: the pleating, the button detail on the centre front, the lace inset in the shoulder/upper back.
I don't like at all: the shaping via tie back, the sleeve length, the elasticated cuff.
Random observation: I like the colour. I happen to own 2.4m of glazed cotton in dark blue, which is the fabric now ear-marked for the final version of this top.
Back in September I started thinking about how I could use a dress pattern from the most recent edition of Ottobre Woman to make my top (and maybe, also, an actual dress). I said, and I quote:
"It's rated as 2 dots by Ottobre (their helpful system is 1-3 dots, not
explained anywhere in the entire magazine) but it doesn't LOOK that
complicated. It only has a very few pattern pieces: bodice, skirt,
facings... it sounds
VERY easy."
Ahaha. HAHAHAHA. Oh god. /o\ How delusional was that?
Trying to use this pattern has resulted in me going through a tree worth of pattern tracing paper (luckily I just use ultra cheap tissue stuff), sewing through 3.5m of muslin and failing and failing and failing again for WEEKS. I got to the point where I was seriously considering never again even trying to make a woven top to fit. Even yesterday,
when I was posting about my new knit top I made I was planning this terrible mopey post about how much I hate FBAs and how terrible my (sewing) life is, woe is me.
But then yesterday, I had an epiphany, and it's been all joy and happiness ever since. VICTORY. \o/
 |
| From FFRP. I call this the Tent Pole Effect. |
My problem with the original dress was basically, as almost all my problems with sewing garments has been so far, my breasts. They're very large, which is always a problem, but most significantly for this dress, they're MUCH larger than the ribcage below them, which is also, as I don't have a waist, almost the narrowest point of my body. With loose fitting clothes, I suffer from the Tent Pole Effect, where loose fitting clothes hang straight down from my bust apex, leaving acres of empty air between my ribcage and the fabric. That's fine some of the time, but it does make me look fatter than I am. I do like to wear fitted clothes at least some of the time as a result, and my best look has always been empire line tops that curve in slightly below the bust. In RTW, the problem is finding anything that will go over my bust to start with, and where the empire line actually falls below the bust rather than right at the apex or even above it.
In theory, the Ottobre dress would have produced this. Could I personally achieve that with the Ottobre pattern? Oh,
hell no.
The Ottobre dress is genuinely pretty straight forward. It has a front and back bodice, and a front and back skirt, plus facings, pockets, sleeves, etc. of course, but the important part of the dress is uncomplicated. The front bodice is shaped with two under-bust darts and there is some waist shaping in the side seams at the top of the skirt and bottom of the bodice. Easy, right? Well, no. Here is my list of attempts over a period of about 4 weeks:
1. Muslin in a size 46. It's better not to ask why I started with a size 46, which bears no relation to my actual measurements at all. There's plenty of ease in the pattern, so even though the 46 should not have been wide enough at the bust for me, it was. Of course, it was also billowing around my shoulders, back and the armhole was halfway to my knees. I concentrated, however, on attempting to manipulate the darts to get the fabric to curve in under the bust, and I did manage that. I was literally standing admiring the bust/waist shaping of the muslin in the mirror, congratulating myself smugly when I suddenly woke up to the fact that other than the bust, it actually didn't fit me. Cue weeping, cursing, and sulking.
2. After a pause while I sulked, I went back to the beginning and made four separate attempts to make a new bodice in a more sensible size, three on paper, one in fabric. My high bust measurement puts me exactly between a 42 and a 44, and with the ease I noticed in the 46, I went for the 42. I got a lot of practice making
FFRP FBAs, including the revised Y-shaped FBA, which I will probably appreciate at some future stage, although not at present. However, manipulating the dart below the bust to get the shape to curve in? Not going to happen. To get enough width at the bust, I kept ending up with ACRES of fabric below the bust, which defied all shaping. I literally needed to dart out 20cm of fabric. I tried side darts (not enough room to improve anything). I tried draping the darts on my body (resulted in Madonna-style conical breasts). I could have gathered it, but that's not the look I wanted. Cue more weeping, cursing and sulking.
And then, EPIPHANY, brought to you by three things:
1. My actual wardrobe. My favourite ever, most flattering (and tragically too small for me at the moment) blouse is an empire waisted black pinstripe blouse from M&S. My dream is to sew many similar versions of it because (a) despite being my favourite it's actually too short; and (b) I just love it and it looks amazing on me and I want to wear a (longer) version of it every day. When it fits, it's the blouse I reach for the instant it's out of the wash. It even looks pretty good right now, and it's really not my size at the moment. It's empire line, which I already knew, but when I looked at it more closely yesterday to try to figure out the bust shaping, I realized it was done with an armhole princess.
2. Every single
Pepperberry (the shop that makes clothes for large-busted women) top, blouse or dress that I have on my wish-list? Armhole princess. They do other styles, of course, but the shape I wanted, with the bust shaping that curves in to the ribcage? Armhole princess.
So, hey, maybe an armhole princess bodice is the way forward, do you think?
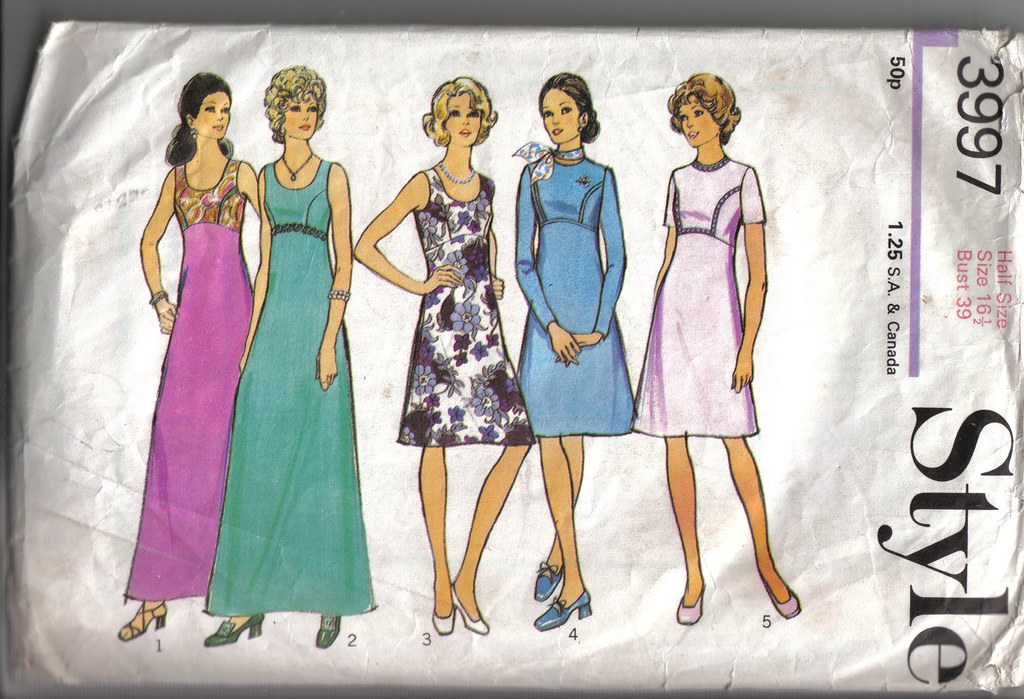
 |
| Style 3997, 1970s dress pattern |
3. And here was the doozy of an epiphany. I
already own the perfect armhole princess dress pattern to use to make a version of the Ottobre dress. It came in a job lot of 9 vintage patterns I bought on eBay, which I wanted for three of the other patterns in the package. I paid the equivalent of 93p per pattern with p&p. It's Style 3997 (Style being a now defunct pattern company) and it dates from the 1970s (per the copyright, no earlier than 1972). There were two problems: (a) It's missing one pattern piece (the long sleeve; the previous owner/seamstress cut it off to make the short-sleeved version), although it's otherwise intact. (b) It is a half-size (size 16.5, bust 39") which is intended for petite women of height of up to 5'3". I'm closer to 5'9". I had previously picked up a half size pattern, read up on it, and realized un-petite-ing it was needlessly complicated. When my bundle arrived I just kind of ignored this pattern.
NOT ANYMORE.
In the next post in this series: Franken-patterning a top from Ottobre 2012-5-1 and Style 3997, including How I Did A Successful FBA On An Armhole Princess Pattern, Go Team Me \o/