Anyway, on with the bags!
 |
| On the left: the Birds and Stripes bag; on the right, my entry for the PR Handbag contest, the Sea-farer's Satchel |
I'm going to start with the bag I made to enter the PR competition:
BAG #1: The Sea-Farers Satchel, a.k.a. The 'Too Cool for School' Satchel by Lisa Lam.
 |
| The Sea-Farer's Satchel |
 |
| "Too Cool For School" Satchel -- pattern photo |
Pattern Description: This bag was made using the "Too Cool For School Satchel" pattern by Lisa Lam, taken from her second bag-making book A Bag For All Reasons. The author describes it as follows:
"The design is based on the traditional leather satchel used by English schoolchildren and professors alike. There is something so romantic about old-fashioned school uniform with cute caps and smart blazers -- this style of satchel is a key part of this look"
The bag is a simple rectangular satchel with a large main pocket and a smaller front pocket. It has a long cross-body adjustable strap.
I'm a huge fan of this shape of bag and although I would like a nice leather one as well, I thought I would give making a fabric version a try. I've seen bags in this shape in Modcloth and other fashion sites recently as well. I call my bag the Sea-Farer's Satchel because the colours and the overlapping stripes put me in mind of the ocean.
 |
| Sides of the bag so you can see the front pocket and the riveted straps |
Pattern Sizing: I made the pattern in the original size. Since all the pieces are very simple shapes it could very easily be made smaller or larger to suit. The main pocket of my bag is about 33cm wide and 22cm tall.
Did it look like the photo/drawing on the pattern envelope once you were done sewing with it?
Yes, I think so, although I think the one in the book is a larger version. Either that or the model is tiny, one of the two.
Were the instructions easy to follow? They are very detailed. I have to admit I barely used them though as the bag construction is fairly straightforward really. A beginner or someone who has made very few bags before would have no problem following them, although some of the sewing of the gussets might be a little tricky for someone with less experience.
What did you particularly like or dislike about the pattern? I love the shape and style of the bag and I also really like the size. I started out a bit dubious, thinking it would be too small, but it turned out larger than I expected, somehow. I was also doubtful about the seam construction. You sew the lining and exterior together of each main panel together, and then attach it, seams facing out, to a similarly constructed gusset. I thought this might look awkward -- a sandwich full of seams -- and considered changing the construction and binding the seams instead. However, I really like the way it turned out and I don't think the end result is at all bag.
The main thing I disliked was the use of sliders to close the bag. I am no fan of them on bags I carry because I find them a nuisance to do and undo all the time. I made some small modifications and substituted a twist lock. I also didn't use the suggested strap shape, only because I forgot to trace the shape and then couldn't be bothered at that point!
 |
| Original fabric and hardware pre-installation |
Fabric Used: An asymmetric stripe home decor weight fabric in white, duck egg, navy and orange. I cut my fabric so not too much of the orange was in my bag, just a couple of contrasting stripes in the gusset. The bag is lined in the same fabric as the exterior, mainly because of the exposed side seams.
This bag is interfaced like you wouldn't believe. I had to alter the interfacing a little based on what was available and not too ridiculously expensive. Lisa Lam recommends heavy interfacing and an ultra-heavy double-sided interfacing that you use to fuse together the lining and exterior when they are sewn. I couldn't locate the ultra-heavy double-sided, so I used a layer of ultra heavy fusible on lining and body pieces, and then used an inexpensive medium weight double-sided fusible to bind my exterior and lining pieces together. The gusset is just lined with heavy weight. Despite the changes, I am really pleased with the outcome -- the main pieces are flexible enough to e.g. fold over for the flap, but strong enough that the bag stands upright unaided and holds its rectangular shape. Anyone making the bag though should be prepared to leave plenty of time for interfacing.
As far as hardware is concerned, I used rectangular silver sliders and rings for my adjustable strap. I also used, for the first time ever, a twist lock fastening. The one I used is in the Mulberry style, a large oval shape. I think it looks great, but installation was pretty painful as it required cutting several holes into the finished bag flap and a lot of fray check. The straps are riveted rather than sewn to the bag.
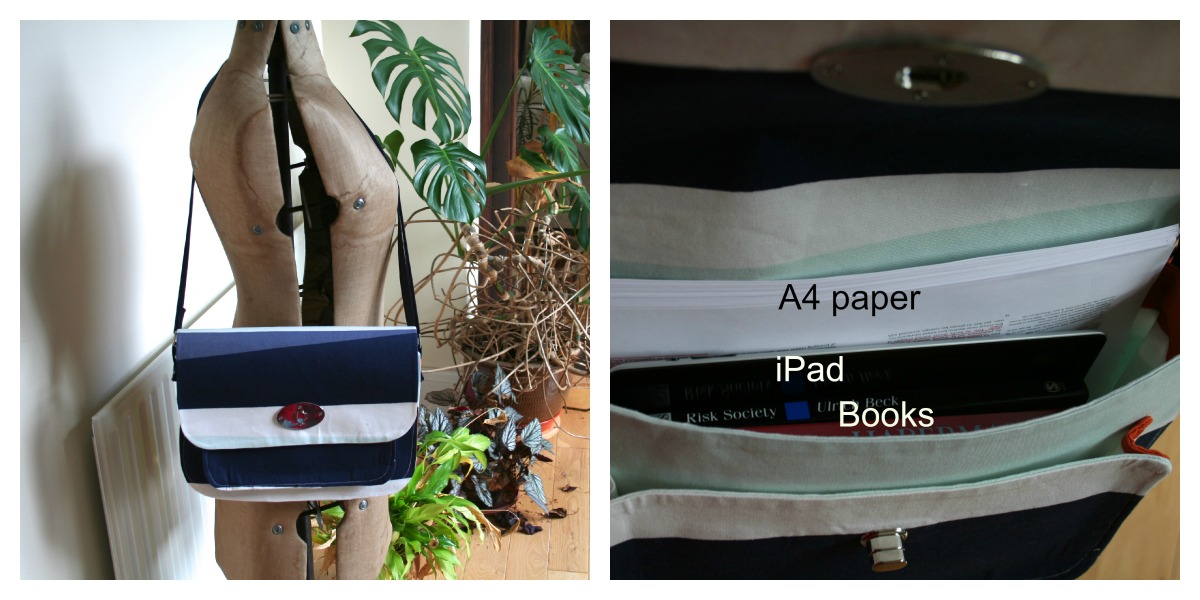 |
| Some shots for scale -- with Flossie and with some (labelled) contents! |
 Pattern alterations or any design changes you made: The main alteration was to make use of the twist lock. In order to close the bag and have it cover the front pocket nicely, I needed to make the top piece about 6cm longer in total. Since it's basically a giant rectangle this was totally unproblematic.
Would you sew it again? Would you recommend it to others? Definitely, on both counts. I like this bag a lot and am very pleased with it. I think most moderately experienced bag-makers would find it easy to make and beginners would be fine so long with a little extra time and effort. It's not really a "first bag ever" bag though, just because of sewing the gussets onto the very rigid main panel.
Conclusion: A bag I am really pleased with (and one I am proud to have entered into the handbag competition!)
BAG #2: The "Birds and Stripes" Bonsai Bag
This one went straight into my etsy shop. I'm not going to do a full pattern review, but it's a cute little pattern -- the Bonsai Bag by Made By Rae. I highly recommend it!

Loving your bags.
ReplyDeleteThanks, I love making them! :D
ReplyDelete